Installing GlobalSight on Windows
Contents
- 1 Prerequisites
- 2 Installing the GlobalSight files
- 3 Configuring GlobalSight Web Services (optional)
- 4 Installing the Aligner (optional)
- 5 Installing the MS Office Converters
- 6 Installing the FrameMaker 9 Converter
- 7 Installing the InDesign and Illustrator Converter
- 8 Configuring GlobalSight for Auto-Import (optional)
- 9 Preparing documents for import
- 10 Starting and stopping GlobalSight
- 11 Logging in to GlobalSight
- 12 Uninstalling GlobalSight
Prerequisites
- The GlobalSight software package for Windows has been downloaded as described in Installing GlobalSight
- Third-party components have been installed as described in Installing Third-party Components for GlobalSight on Windows
Note that Internet Explorer (IE) is the only browser fully supported at the moment.
Installing the GlobalSight files
To install the GlobalSight files:
- Ensure that Java is in your PATH. To verify, type:
echo %PATH% - Ensure that <MySQL_ROOT>/bin is in your PATH and that you can access the GlobalSight MySQL Server from the MySQL command line
- Unzip the GlobalSight.zip file to the GlobalSight Application home directory
- Using the command line, go to the GlobalSight Application home directory
- CD to the install directory and run the GlobalSight install script install.bat
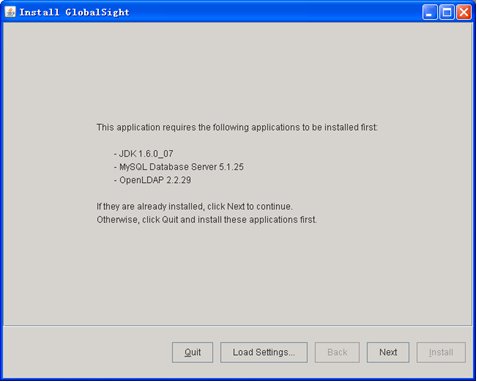
- Click Next when the GlobalSight GUI Installation interface
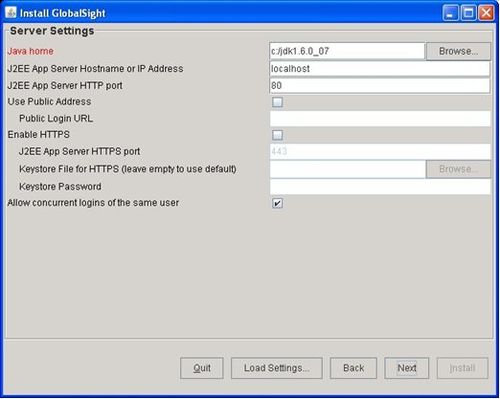
Entering the server settings
In Server Settings, enter the installation parameters and click Next. Use the table below as a guide.
| Parameter | Description |
|---|---|
| Java home | The JAVA_HOME to run the application server.
Default: c:/jdk1.6.0_07 |
| J2EE App Server Hostname or IP Address | Name of the server on which you installed the App Server. Enter the fully qualified name of the host, e.g. machine.domain.com
Default: localhost |
| J2EE App Server HTTP port | The web server HTTP port for the App Server.
Default: 80 |
| Use Public Address | Flag (true or false) to use a public address for the App Server to login.
Default: false |
| Public Login URL | The public login url for the App Server. |
| Enable HTTPS | Flag (true or false) to enable HTTPS for the App Server.
Default: false |
| J2EE App Server HTTPS port | The web server HTTPS port for the App Server.
Default: 443 |
| Keystore File for HTTPS(leave empty to use default) | The keystore file for HTTPS authentication.
Default: empty. Default self-signed certificate |
| Keystore Password | The keystore file’s password for HTTPS authentication.
Default: empty. Default self-signed certificate’s password: changeit |
| Allow concurrent logins of the same user | Flag (true or false) to allow concurrent logins of the same user. If set to false, you will not be able to login twice (concurrently) with the same username. If you want to login as the second user, the first user must logout or you must wait for their session to time out.
Default: true |
Entering the application settings
In Application Settings, enter the installation parameters and click Next. Use the table below as a guide.
| Parameter | Description |
|---|---|
| GlobalSight Administrator username | The user you will use to first log in to GlobalSight and to create all the other users initially. This user will be created in OpenLDAP when you import the globalsight.ldif file below.
Use the default value. Default: superAdmin |
| GlobalSight Administrator password | The password of GlobalSight Administrator username
Default: password |
| GlobalSight Super Company Name | The name of the super company of GlobalSight.
Default: Welocalize |
| GlobalSight file storage directory | This is a permanent directory GlobalSight will use to store temporary files.
Default: d:\FileStorage |
| Logging level | Debugging level.
Default: INFO |
| Write debug files | Flag (true or false) to enable writing to the debug directory.
Default: false |
| Enable Job Costing | Flag (true or false) to enable the Job Costing feature.
Default: true |
| Enable job revenue details | If this module has been purchase then answer “true”, otherwise answer “false.”
Default: true |
| Comment Sort Order | Default: default |
| Enable Local Content Management | Flag (true or false) to enable the Local Content Management feature.
Default: true |
| Enable reporting | Flag (true or false) to enable the Reporting feature of GlobalSight.
Default: true |
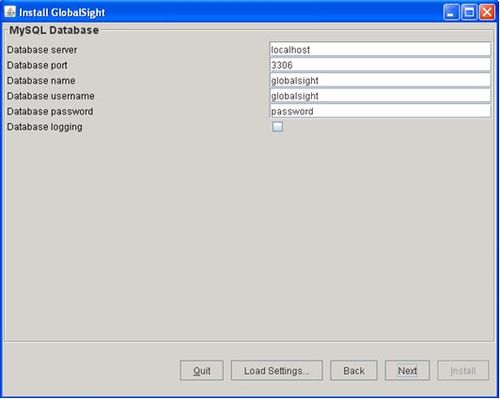
Entering the database settings
In MySQL Database, enter the installation parameters and click Next. Use the table below as a guide.
| Parameter | Description |
|---|---|
| Database server | The server name where the MySQL is installed, for example, machine.domain.com or localhost
Default: localhost |
| Database port | The MySQL port
Default: 3306 |
| Database name | The MySQL database name that you want to connect to.
Default: globalsight |
| Database username | The username of the MySQL database, for example, globalsight
Default: globalsight |
| Database password | The password for the database user above
Default: password |
| Database logging | Flag (true or false) to enable logging of SQL statements of hibernate and other database related information.
Default: false |
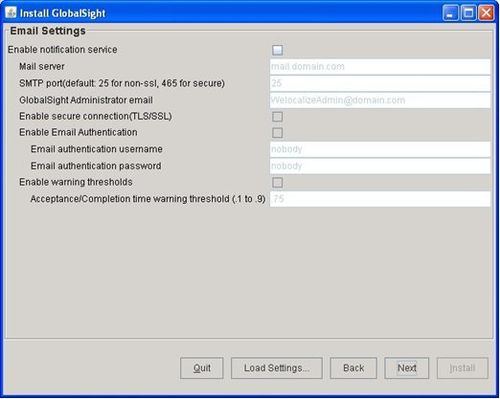
Entering the email settings
In Email settings, enter the installation parameters and click Next. Use the table below as a guide.
| Parameter | Description |
|---|---|
| Enable notification service | Flag (true or false) to enable the Email Notification feature of GlobalSight
Default: false |
| Mail server | The mail server, for example, smtp.gmail.com
Default: mail.domain.com |
| SMTP port(default: 25 for non-ssl, 465 for secure) | The SMTP port for the mail server
Default: 25 |
| GlobalSight Administrator email | The email address of the GlobalSight Administrator. When something goes wrong in the system, this person gets an email
Default: WelocalizeAdmin@domain.com |
| Enable secure connection(TLS/SSL) | Flag (true or false) to enable secure connection
Default: false |
| Enable Email Authentication | Flag (true or false) to enable the Email Authentication feature of GlobalSight. This feature should be enabled only when the mail server used by GlobalSight requires authentication
Default: false |
| Email authentication username | The mail server user that authenticates all email sent from GlobalSight. This is a special mail server user created just for GlobalSight email authentication purposes. You must add this user to the mail server that you specified above.
Note: The username is not the username of the sender of GlobalSight email, since GlobalSight emails can be sent from multiple users This parameter is ignored if the Enable Email Authentication parameter above is disabled Default: nobody |
| Email authentication password | The password for the Email authentication user above
This parameter is ignored if the Enable Email Authentication parameter above is disabled Default: nobody |
| Enable warning thresholds | This enables thresholds for Job Acceptance/Completion/ warnings
Default: false |
| Acceptance/Completion time warning threshold | The time when the Acceptance or Completion Warning email isbe sent. This value is the time elapsed in percent between:
This parameter is ignored if the Warning Thresholds parameter above is disabled Default: .75 |
Entering the optional package settings
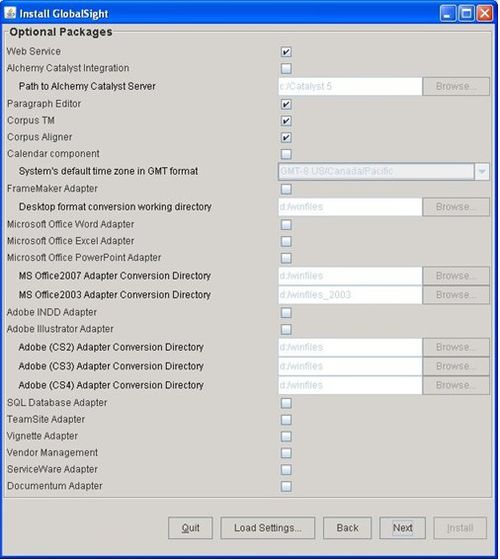
In Optional Packages, enter the installation parameters and click Next. Use the table below as a guide.
| Parameter | Description |
|---|---|
| Web Service | This enables the Web Service capability of GlobalSight. Web Service and Desktop Icon do not work if they are not checked-.
Default: true |
| Alchemy Catalyst Integration | This enables the Alchemy Catalyst Integration capability of GlobalSight. This capability does not work if this is not checked
Default: false |
| Path to Alchemy Catalyst Server | Default: c:\Catalyst 5 |
| Paragraph Editor | This enables the Paragraph Editor feature of GlobalSight. This feature doesl not work if this is not checked.
Default: true |
| Corpus TM | This enables the Corpus TM capability of GlobalSight. This capability does not work if this is not checked
Default: true |
| Corpus Aligner | This enables the Corpus Aligner capability of GlobalSight. This capability does not work if this is not checked
Default: true |
| Calendar component | This enables the Calendar capability of GlobalSight. This capability does not work if this is not checked.
Default: false |
| System’s default time zone in GMT format (i.e. GMT-8:00 for US) | This sets the time zone used by GlobalSight for all time and date calculations. This value is expressed in hours from Greenwich Mean Time. The default is set to GMT-8, which is Pacific Standard Time for the West Coast of the US and Canada.
Default: GMT-8:00 |
| FrameMaker Adapter | This enables GlobalSight to work with FrameMaker 9. The adapter does not work if this is not checked. Default: false
If this is set to true, you need to set up the converter for it. For instructions, see the Installing the FrameMaker 9 Converter section of this document. |
| FrameMaker 9 Adapter Conversion Directory | The directory that the GlobalSight FrameMaker 9 Converter uses for import and export. This parameter is ignored if the FrameMaker Adapter above is disabled.
Default: d:\winfiles |
| Microsoft Office Word Adapter | This enables GlobalSight to work with Microsoft Word. This adapter does not work if this is not checked
Default: false If this is set to true, you need to set up the converter for it. For instructions, see the Installing the MS Office Converters section of this document |
| Microsoft Office Excel Adapter | This enables GlobalSight to work with Microsoft Excel. This adapter does l not work if this is not checked.
Default: false If this is set to true, you need to set up the converter for it. For instructions, see the Installing the MS Office Converters section of this document |
| Microsoft Office PowerPoint Adapter | This enables GlobalSight to work with Microsoft PowerPoint. This adapter does not work if this is not checked.
Default: false If this is set to true, you need to set up the converter for it. For instructions, see the Installing the MS Office Converters section of this document |
| MS Office 2007 Adapter Conversion Directory | The directory that the GlobalSight MS Office 2007 Adapter feature l uses for internal processing. This parameter is ignored if the Enable Microsoft Office integration parameter above is disabled
Default: d:\winfiles |
| MS Office 2003 Adapter Conversion Directory | The directory that the GlobalSight MS Office 2003 Adapter feature uses for internal processing. This parameter is ignored if the Enable Microsoft Office integration parameter above is disabled
Default: d:\winfiles_2003 |
| Adobe INDD Adapter | This enables GlobalSight to work with Adobe InDesign. The adapter does not work if this is not checked
Default: false If this is set to true, you need to set up the converter for it. For instructions, see the Installing the ADOBE InDESIGN & ILLUSTRATOR Converters section of this document |
| Adobe Illustrator Adapter | This enables GlobalSight to work with Adobe Illustrator. This adapter does not work if this is not checked
Default: false If this is set to true, you need to set up the converter for it. For instructions, see the Installing the ADOBE InDESIGN & ILLUSTRATOR Converters section of this document |
| Adobe(CS2) Adapter Conversion Directory | The directory that the GlobalSight Adobe InDesign CS2 and Illustrator Adapter feature uses for internal processing. This parameter is ignored if the nable Adobe integration parameter above is disabled
Default: d:\winfiles |
| Adobe(CS3) Adapter Conversion Directory | The directory that the GlobalSight Adobe InDesign CS3 and Illustrator Adapter feature uses for internal processing. This parameter is ignored if the Enable Adobe integration parameter above is disabled
Default: d:\winfiles |
| Adobe(CS4) Adapter Conversion Directory | The directory that the GlobalSight Adobe InDesign CS4 and Illustrator Adapter feature uses for internal processing. This parameter is ignored if the Enable Adobe integration parameter above is disabled
Default: d:\winfiles |
| Adobe(CS5) Adapter Conversion Directory | The directory that the GlobalSight Adobe InDesign CS5 and Illustrator Adapter feature uses for internal processing. This parameter is ignored if the Enable Adobe integration parameter above is disabled
Default: d:\winfiles |
| SQL Database Adapter | This enables the Database Integration feature of GlobalSight. The adapter does not work if this is not checked
Default: false |
| TeamSite Adapter | This enables the TeamSite integration feature of GlobalSight. This feature does not work if this is not checked
Default: false |
| Vignette Adapter | This enables the Vignette integration feature of GlobalSight. The adapter does not work if this is not checked
Default: false |
| Vendor Management | This enables the Vendor Management capability of GlobalSight. Vendor Management does not work if this is not checked
Default: false |
| ServiceWare Adapter | This enables the ServiceWare integration feature of GlobalSight. This feature does not work if this is not checked
Default: false |
| Documentum Adapter | This enables the Documentum integration feature of GlobalSight. This feature does not work if this not checked
Default: false |
Finishing the installation
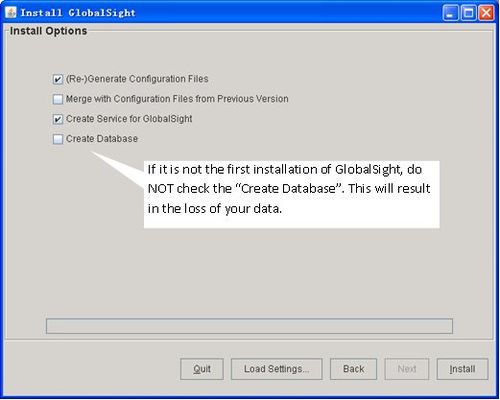
- In Install Options, check all boxes except the second
Note: Create Database should be checked for a brand new GlobalSight installation. This creates the database tables needed for GlobalSight. - Click Install. This starts the installation process for GlobalSight
- If Create database is checked, click Yes on the warning that pops up. Do this on the first installation of GlobalSight, or if you want to re-create the GlobalSight tables
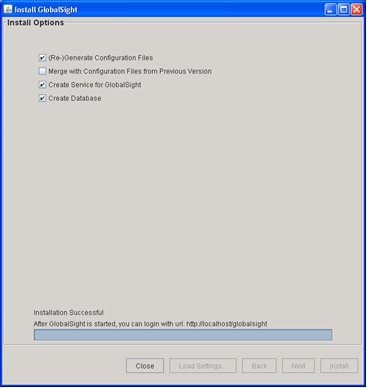
- Click Close once Installation Successful appears
GlobalSight has now been installed.
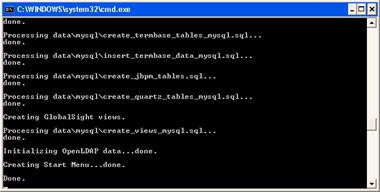
Check the wizard console for any errors that may have been arisen during the database creation.
Note: When creating the database, the installer also copies the necessary LDAP files to OpenLDAP and configures OpenLDAP. You can then skip the configuring OpenLDAP Directory Server section.
Configuring GlobalSight Web Services (optional)
The Web services API allows any client - regardless of implementation technology or operating system - to connect and exchange data with GlobalSight.
To configure the Web Services:
- Log in to GlobalSight as a superadmin
- Click Remote IP Filter for Webservices
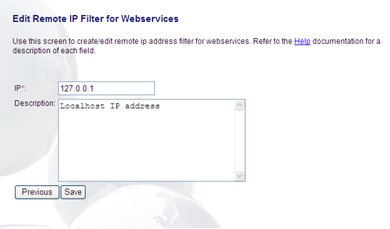
- Click New to add the remote IP address information. For example:
- Click Save
You can use an asterisk (”*”) as a wildcard in place of the last IP address parameter. For example, the IP address "192.168.30.*" allows all network IP addresses that begin with 192.168.30 to use GlobalSight Web services.
Installing the Aligner (optional)
Alignment is the process by which segments in previously-translated files are matched with one another to create translation memory.
The process is partially automated, and the language resource is responsible for confirming the alignment between the source and target segments. This process allows translation memory to be created rapidly from content previously translated.
To install the GlobalSight Aligner (Galigner):
- Unzip the galign-installer.zip to a temporary location
For example: c:\Galigner - Open that location
- For Windows: Click setup.exe
- For Mac: Double-click galign-installer.jar
- For UNIX: Run java –jar galign-installer.jar
Installing the MS Office Converters
Installing .NET Framework 3.5
- Open the Microsoft .NET Compact Framework 3.5, which is included in the GlobalSight package. You can also download it
- Double-click NETCFSetupv35.msi
- Accept all defaults and follow though the installation
- Re-start the computer after the installation finishes (default)
Installing the MS Office 2003 or 2007 converters
The version of the MS Office converter should correspond to the Office version on the machine. Different versions cannot be installed on the same machine.
- Create a shared directory (<ConversionDir> for the purposes of this document), which contains your source files. This should match the directory that you set in the Install Wizard – Optional Packages – MS Office 2003/2007 Adapter Conversion Directory
For example: d:\WINFILES - Under the <ConversionDir>, create a directory for the MS Office format you want to import. For example, “excel”, “word” or “PowerPoint”. Word is used for the purposes of this document
- Enable the Microsoft Word Adapter during the installation of GlobalSight by setting the following installation parameters:
- Microsoft Word Adapter Conversion Directory [D:\WINFILES], as in D:\<ConversionDir>. Do not use a trailing slash in the name. If the conversion directory is n a different computer and is being accessed over the network, do not use a mapped drive. Use the UNC path instead. For example: \\server\WINFILES. Mapped drives do not work if the server has been set to start up automatically on reboot
- Extract GlobalSight_MSOffice2003_Converter.zip or GlobalSight_MSOffice2007_Converter.zip
- Double-click setup.exe to start the installation
Both MS Office 2003 and 2007 converters need .NET framework v3.5.
To start the converters:
- Click Start->Programs->GlobalSight->Office 2007 Converters
- Specify the Conversion Directory
- Click Start All
Uninstalling the converters:
- Stop the Office 2007 Converters
- Click Control Panel->Add or Remove Programs to remove the Office 2007 Converters
Installing the FrameMaker 9 Converter
The GlobalSight FrameMaker 9 Converter requires the Adobe FrameMaker 9 software to be installed.
To install the GlobalSight FrameMaker 9 Converter
- Extract GlobalSight_FrameMaker9_Converter.zip
- Double-click setup.exe to start the installation
To add the plugin to Adobe FrameMaker 9
- Stop FrameMaker 9 application
- Copy <FrameMaker 9 Converter>\fmconv.dll to <Adobe FrameMaker9 Installation Path>\fminit\Plugins folder
- Add the following line to <FrameMaker9 Installation Path>\maker.ini [APIClients] section.
fmconv=Standard, GlobalSight FMConvert, fminit\Plugins\fmconv.dll, all
To start the converter:
- Click Start->Programs->GlobalSight->FrameMaker 9 Converter
- Specify the FrameMaker 9 Path
- Specify the Conversion Directory
This should match the directory that you set in the Install Wizard – Optional Packages – FrameMaker 9 Adapter Conversion Directory. For example: d:\WINFILES - Click Start
To uninstall the converter:
- Stop the FrameMaker 9 Converter
- Click Control Panel->Add or Remove Programs to remove the FrameMaker 9 Converter
Installing the InDesign and Illustrator Converter
The version of the converter for InDesign CS2/CS3/CS4/CS5 and Illustrator CS2 should correspond to the version on the machine. Different versions cannot be installed on the same machine.
To install the InDesign and Illustrator Converter:
- Extract Adobe_CSx_Converter.zip (Adobe_CS4_Converter.zip for InDesign CS4)
- Double-click AdobeConverter.exe to run the converter
- Select InDesign Converter CS2/CS3/CS4/CS5 and Enter or Browse to the directory that is used in the GlobalSight – Optional Packages – Adobe (CS2)/(CS3)/(CS4)/(CS5) Adapter Conversion Directory
- Select Illustrator Converter CS2 and Enter or Browse to the directory that is used in GlobalSight – Optional Packages – Adobe (CS2) Adapter Conversion Directory
- Click Start
Error logs:
Any errors related to the Adobe InDesign & Illustrator converter are logged in the EventLog. Any other errors in normal processing are logged in a file called AdobeConverter.log under the selected directory location.
Uninstalling the converter:
- Click Stop
- Remove the Adobe Converter directory
Configuring GlobalSight for Auto-Import (optional)
This feature allows you to import files automatically into the system.
Prerequisites
Set up GlobalSight with at least one Localization Profile and one File Profile so that the settings you enter below can accurately reference GlobalSight objects for processing and routing.
Setting Auto-Import parameters
- Edit the file <application_home>/autoFileImport.properties
- Use the table below to enter the correct parameters for your GlobalSight installation
Changes to this file require a GlobalSight restart
| Parameter | Description |
|---|---|
| disableAutoImport | Flag (true or false) to enable the entire Auto-Import feature. If it is false, then no directories are watched for auto-import.
Default: false |
| pollingFrequency | The polling frequency in seconds. This is how often the GlobalSight polls the directories for changes.
Default: 60 |
| BatchSize | This determines the number of files to import in a batch when changes have been detected. This only matters if the associated Localization Profile uses Batch instead of WordCount to determine the job size.
For example, if, it has been determined that three files have changed when polling, either three batches containing one file each can be sent, or one batch containing three files The values allowed are “one” or “all” Default: one |
| AssumeUnencounteredFilesAreNew | Flag (true or false) to tell GlobalSight whether or not files in a previously un-scanned directory are new. For example, if the directory en_US\pressReleases exists and has five files before the first time GlobalSight is run, then all five files are identified as new, files and imported if the property is set to true.
If the property is set to false, then the five files are not be imported unless are modified later. A sixth file added to the directory is b identified as new and imported regardless of the setting Default: true |
Specifying the directories to watch
- Edit the file <application_home>/autoFileImport.map
- Enter one line for each directory that you want to watch. Enter each line in the format:
<directory> | <jobNamePrefix> | <FileProfileName>- <directory> is the directory that you want to watch. Watching is recursive, so sub-directories will also be watched
- <FileProfileName> is the File Profile in GlobalSight that corresponds to the files in this directory
For example, the entry:
en_US\pressReleases | PressReleases | My_en_US_HTML_Files
specifies that the directory <globalsight_docs>\en_US\pressReleases is watched by GlobalSight for new and changed files. The files imported from this directory will be processed as specified in the GlobalSight File Profile “My_en_US_HTML_Files”.
Preparing documents for import
- Create the document directory that you entered during the installation of the GlobalSight files
- For example: d:\welocalize\docs
- Create a sub-directory where you store your source files
- For example: d:\welocalize\docs\en_US
- Put the documents you want to import in this directory
- If your source language is different, replace en_US with your source language locale. For example: es_MX.
Starting and stopping GlobalSight
You can start and stop GlobalSight using the options below.
The procedure starts and stops JBoss only. All other GlobalSight components run as automatic services and are therefore already running when the machine is started.
- To start GlobalSight from the Start Menu, click Start -> All Programs -> GlobalSight -> Start GlobalSight
- To stop GlobalSight from the Start Menu, click Start -> All Programs -> GlobalSight -> Stop GlobalSight
To start GlobalSight in Service Mode:
- Click Start -> Run
- Type services.msc and submit
- In the Service Window, find the GlobalSight Service
- Right-click it and select Start
To stop GlobalSight in Service Mode:
- Click Start -> Run
- Type services.msc and submit
- In the Service Window, find the GlobalSight Service
- Right-click it and select Stop
To start GlobalSight in Console Mode
- Run <GlobalSight Server Directory>/jboss/startJboss.cmd
- Wait for the following sentence:
-----------JBOSS -- GlobalSight started ------------
To stop GlobalSight in Console Mode, press Ctrl+C in the JBoss Console or close the JBoss Console directly.
Logging in to GlobalSight
- Open Internet Explorer and go to http://server.domain.com:port/globalsight/
"server.domain.com" is the value entered for " J2EE App Server Hostname or IP Address"
"port" is the value entered for " J2EE App Server HTTP port" - Username: superAdmin, GlobalSight Administrator user.
- Password: password, the password for GlobalSight Administrator user.
Uninstalling GlobalSight
To uninstall the GlobalSight components, follow the steps below in the order listed.
All of these procedures assume that GlobalSight is NOT running.
Uninstalling the Application Service
Execute UninstallApp-NT.cmd in folder <GlobalSight_home>\install\JavaServiceWrapper\bin.
Uninstalling JDK
To uninstall JDK:
- Open Control Panel-> Add/Remove Programs
- Remove the following components:
- Java DB
- Java(TM)
- Java(TM) SE Development Kit
Uninstalling MySQL
To uninstall MySQL:
- OpenControl Panel > Add/Remove Programs
- Remove MySQL Server
To clean up the Start menu:
- Open the <GlobalSight_home>\install\JavaServiceWrapper\bin folder
- Double-click RemoveStartMenu.cmd
Cleaning up the system PATH variable
To clean up the system PATH variable:
- Open Control Panel->System->Advanced->Environment
- Remove the entries for the products that you have uninstalled
You can now remove the <GlobalSight_home> folder.
