Installing Third-party Components for GlobalSight on Ubuntu
This guide describes how to install the required third-party components for GlobalSight on Ubuntu server. If not specified, the Ubuntu Server is 14.04 LTS version. This guide has been updated to cater for GlobalSight version 8.6.7. If you need install and run GlobalSight version prior to 8.6.7, read System requirements to find the supported JDK and MySQL Server version for previous GlobalSight version.
Contents
- 1 Prerequisites
- 2 Choosing passwords for GlobalSight components
- 3 Installing the MySQL Database Server and Client
- 3.1 Installing MySQL using APT repository
- 3.2 Installing MySQL Client for GlobalSight application server
- 3.3 Installing MySQL using Generic Binary packages
- 3.4 Increasing max_connections value for MySQL 5.6 and MySQL 5.7
- 3.5 Starting MySQL Database Server
- 3.6 Setting password for MySQL root user
- 3.7 Creating the GlobalSight database and user using the MySQL command line
- 3.8 Testing the MySQL setup
- 4 Installing JDK
Prerequisites
- The GlobalSight software package for Ubuntu has been downloaded as described in Installing GlobalSight.
- Download MySQL Community Server from the MySQL website.
- Download Java Development Kit from the Oracle website.
- The login user has the sudo privilege.
- Note 1: For GlobalSight version 8.6.3 and above, Oracle JDK 8 (at least 1.8.0_u45) is required.
- Note 2: Beginning with GlobalSight version 8.6.6, MySQL Community Server 5.5, 5.6, and 5.7 are supported.
Choosing passwords for GlobalSight components
Use an at least 8-character password, that is the combination of the alphanumerical characters and symbols. Note that DO NOT contain less than (<), greater than (>), ampersand (&), apostrophe ('), or double quotes (") sign in password. For reference, the following is a list of usernames and passwords for all of the GlobalSight components. Your new cross-component GlobalSight password is shown as <password>.
| Component | Username | Password | Description |
|---|---|---|---|
| MySQL | root | <password> | The root-user for MySQL. Installing MySQL Community Server using generic binary packages won't set password for MySQL root user, but it is recommended to set it after the installation. |
| MySQL | globalsight | <password> | The user that owns all of the GlobalSight tables. |
Installing the MySQL Database Server and Client
Here we describe two means to install MySQL Database Server and Client on Linux: installing with APT repository for Ubuntu and Debian distribution, and installing with generic binary package for common Linux distributions. Visit Installing MySQL on Linux for more details about installing MySQL on various Linux distributions.
You can install the MySQL Database Server and GlobalSight application on separate servers, just make sure that MySQL command-line client is installed on the same server as the GlobalSight application.
Installing MySQL using APT repository
As described on the MySQL website, "The MySQL APT repository provides a simple and convenient way to install and update MySQL products with the latest software packages using Apt". We recommend this means to install MySQL on Ubuntu Server.
Depending on Ubuntu Server's version, a version of MySQL server, client tools, and other components is already included in Ubuntu's native APT repository. Below table lists the MySQL major release version in each Ubuntu Server version.
| Ubuntu Server version | MySQL version |
|---|---|
| Ubuntu Server 12.04.5 LTS | MySQL 5.5 |
| Ubuntu Server 14.04.3 LTS | MySQL 5.5 |
| Ubuntu Server 15.10 | MySQL 5.6 |
| Ubuntu Server 16.04 LTS | MySQL 5.7 |
Prerequisites
- The current user has sudo privilege.
- Internet access.
- MySQL server or client is not installed.
- Check whether MySQL generic binary package is installed
- Type: whereis mysqld mysql
- If nothing returns after mysqld: and mysql:, then no MySQL server or client is installed on Ubuntu Server.
- Read Uninstall MySQL generaic binary package to remove MySQL generic binary package if needed.
- Check whether MySQL server or client is installed using APT repository or using Debian packages
- Type dpkg -l | grep mysql | grep ii
- If nothing returns, then no MySQL server or client is installed on Ununtu Server.
- Check whether MySQL generic binary package is installed
To install MySQL using Ubuntu native APT repository
- Update APT reposity list
- Type: sudo apt-get update
- Install MySQL Server and Client at the same time
- Type: sudo apt-get install mysql-server mysql-client
- Check the packages will be installed carefully, if no problem, type Y to continue.
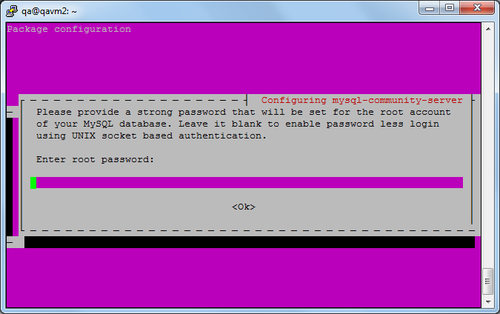
- During the installation, you are required to set password for MySQL root user.
- When installation is finished,MysQL server starts automatically.
- Note 1: You can omit mysql-client in above command, because APT tool will install the command-line client tool with mysql-server together by default.
- Note 2: This command is also used to upgrade MySQL to the latest version in APT repository.
- Stop MySQL service for further configuration
- Type: sudo service mysql stop
- Note: beginning with Ubuntu Server 15.04, you can use command sudo systemctl stop mysql instead.
To install MySQL using MySQL APT repository
Besides Ubuntu's native APT repository, MySQL also provides APT repository for latest MySQL 5.6 and 5.7 version.
- Download MySQL APT repository deb package from the MySQL website to local system
- The latest deb package is mysql-apt-config_0.6.0-1_all.deb, visit MySQL APT Repository to download it.
- Install the MySQL APT repository
- Type: sudo dpkg -i mysql-apt-config_0.6.0-1_all.deb
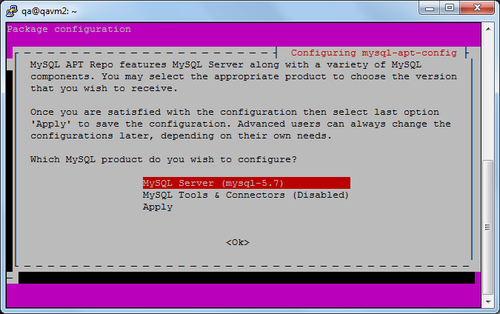
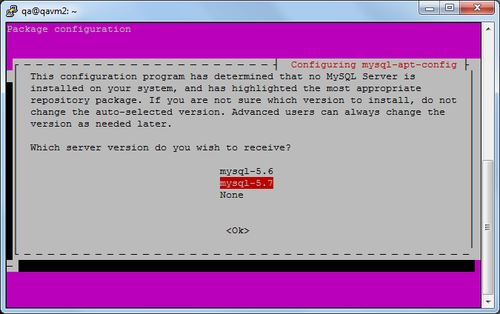
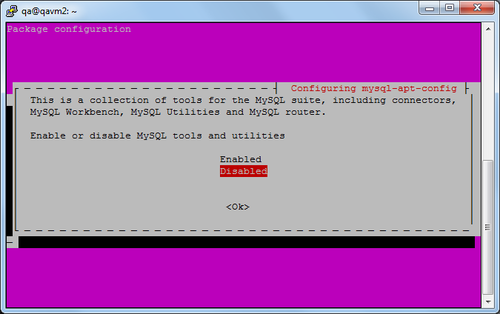
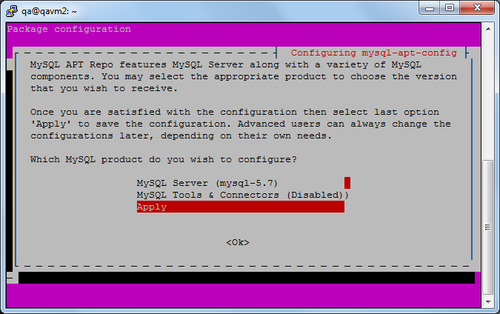
- You will see below screen appears
- By default, MySQL APT repository will install MySQL Server 5.7, and MySQL Tools & Connenctors is disabled. This configuration is suitable for Ubuntu Server version.
- You can press Enter to change MySQL Server to 5.6 version.
- If the Ubuntu Server have a GUI window, you can install MySQL Tools & Connenctors too.
- On the main package configuration screen, Select Apply and press Enter to continue.
- Update the repository
- Type: sudo apt-get update
- Install MySQL Server and Client
- Type: sudo apt-get install -y mysql-server mysql-client
- Stop MySQL service for further configuration
- Type: sudo service mysql stop
- Note: beginning with Ubuntu Server 15.04, you can use command sudo systemctl stop mysql instead.
To configure the database
- Edit file /etc/mysql/my.cnf for MySQL 5.5
- Add below lines under [mysqld] section
lower_case_table_names=1character-set-server=utf8collation-server=utf8_general_ciinnodb_file_per_table=1innodb_buffer_pool_size=1G
- Uncomcent and update below line
max_connections=800
- Update below line
max_allowed_packet=50M
- Replace below line
key_buffer=16Mtokey_buffer_size=16M
- Comment below line
bind-address=127.0.0.1
- Edit file /etc/mysql/mysql.cnf for MySQL 5.6 and 5.7
- Add below lines at the file bottom
[mysqld]lower_case_table_names=1character-set-server=utf8collation-server=utf8_general_ciinnodb_buffer_pool_size=1Gmax_connections=800max_allowed_packet=50Mbind_address=*
- Edit file /etc/mysql/mysql.cnf for MySQL 5.7
- Add below lines under [mysqld] section
sql_mode=STRICT_TRANS_TABLES,NO_ENGINE_SUBSTITUTION,NO_ZERO_DATE,NO_ZERO_IN_DATE,ERROR_FOR_DIVISION_BY_ZERO,NO_AUTO_CREATE_USER
- Note 1: the default value of
innodb_buffer_pool_sizeis set to 128M, you can increase it if system hardware allows. - Note 2: for MySQL 5.6 and 5.7, the max value of
max_connectionsmay be limited to 214 by Ubuntu Server.
Installing MySQL Client for GlobalSight application server
If you prefer to install MySQL database and GlobalSight application on separate servers. You should install MySQL Client on the same server as the GlobalSight application.
To install MySQL Client only
- Update APT repository
- Type sudo apt-get update
- Install MySQL Client
- Type sudo apt-get install -y mysql-client
Installing MySQL using Generic Binary packages
You can also install MySQL using generic binary package which allows more detailed configuration while MySQL installation.
Prerequisites
- You have downloaded the latest supported version.
- The current user has read/write privileges to the /usr/local directory.
- The current user has the sudo privilege.
- Uninstall any versions of MySQL previously installed using native APT repository
- Type: sudo service mysql stop
- Type: sudo apt-get remove mysql-server mysql-client
- Type: sudo apt-get autoremove
- Type: sudo rm -r /etc/mysql
- Install shared library required by MySQL
- Type: sudo apt-get update
- Type: sudo apt-get install libaio1
To install MySQL
- Download and copy MySQL generic binary package, for instance,mysql-5.5.48-linux2.6-x86_64.tar.gz, or mysql-5.7.11-linux-glibc2.5-x86_64.tar.gz to local system
- Unpack the compressed tar package
- Type: cd /usr/local
- For MySQL 5.5
- Type: sudo tar zxvf /path/to/mysql/package/mysql-5.5.48-linux2.6-x86_64.tar.gz
- Or for MySQL 5.7
- Type: sudo tar zxvf /path/to/mysql/package/mysql-5.7.11-linux-glibc2.5-x86_64.tar.gz
- Create a symbolic link for the MySQL directory
- For MySQL 5.5
- Type: sudo ln -s /usr/local/mysql-5.5.48-linux2.6-x86_64 mysql
- Or for MySQL 5.7
- Type: sudo ln -s /usr/local/mysql-5.7.11-linux-glibc2.5-x86_64 mysql
- For MySQL 5.5
- Remove the compressed tar package
- Type: sudo rm -f /path/to/mysql/package/mysql-5.*.tar.gz
- Create user and group mysql for MySQL
- Type: sudo useradd -r -s /bin/false mysql
- Change the owner and group attributes of the files to the MySQL user
- Type: cd mysql
- Type: sudo chown -R mysql:mysql .
- Note: do not omit the period at the end.
- Set up the MySQL internal database by running the script
- For MySQL 5.5
- Type: sudo scripts/mysql_install_db --user=mysql --basedir=/usr/local/mysql --datadir=/usr/local/mysql/data
- Type: sudo chown -R mysql:mysql data
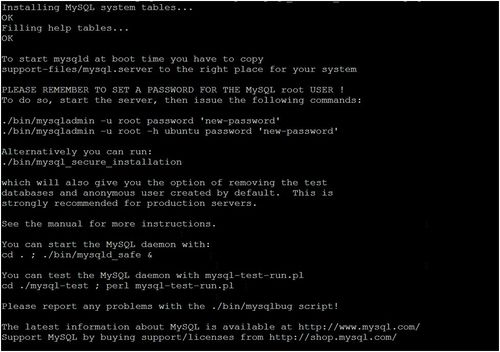
- The information below pops up when the script is imported successfully.
- Or for MySQL 5.7
- Type: sudo mkdir mysql-files
- Type: sudo bin/mysqld --initialize-insecure --user=mysql --basedir=/usr/local/mysql --datadir=/usr/local/mysql/data
- Type: sudo bin/mysql_ssl_rsa_setup
- Type: sudo chown -R mysql:mysql data mysql-files
- Note: these commands apply to MySQL 5.7.6 and later.
- For MySQL 5.5
- Create a automatic start script for MySQL
- Type: sudo cp support-files/mysql.server /etc/init.d/mysql
- Type: sudo update-rc.d mysql defaults 98
- Set the MySQL executable binary path by adding the following to the bottom of /etc/profile file
export PATH=$PATH:/usr/local/mysql/bin- Note: you need to log in again for the new PATH variable to take effect.
To configure the database
When MySQL is installed, we still need set or update some MySQL global variables before creating GlobalSight database.
- Create the /etc/mysql directory, if it does not already exist
- Type: sudo mkdir /etc/mysql
- Copy the default configuration file for the expected size of the database
- For MySQL 5.5
- Type: sudo cp /usr/local/mysql/support-files/my-medium.cnf /etc/mysql/my.cnf
- For MySQL 5.7
- Type: sudo cp /usr/local/mysql/support-files/my-default.cnf /etc/mysql/my.cnf
- Type: sudo chown mysql:mysql /etc/mysql/my.cnf
- For MySQL 5.5
- Add or update the following under the [mysqld] section in /etc/mysql/my.cnf
- Update or add below line for all MySQL versions:
max_allowed_packet = 50M
- Add below lines for all MySQL versions:
lower_case_table_names=1character-set-server=utf8collation-server=utf8_general_ci
- Add below lines for better performance for all MySQL versions:
max_connections=800
- Comment below lines for MySQL 5.5:
log-bin=mysql-binbinlog_format=mixed
- Update or add below lines for MySQL 5.5:
table_open_cache=400query_cache_size=16Mnet_buffer_length=16Kthread_cache_size=8innodb_buffer_pool_size=1Ginnodb_file_per_table=1
- Uncomment and update below lines for MySQL 5.7:
basedir=/usr/local/mysqldatadir=/usr/local/mysql/dataport=3306socket=/tmp/mysql.sockinnodb_buffer_pool_size=1G
- Update below line for MySQL 5.7:
sql_mode=STRICT_TRANS_TABLES,NO_ENGINE_SUBSTITUTION,NO_ZERO_DATE,NO_ZERO_IN_DATE,ERROR_FOR_DIVISION_BY_ZERO,NO_AUTO_CREATE_USER
- Note 1: for MySQL 5.6 and 5.7, the max value of
max_connectionsmay be limited to 214 by Ubuntu Server. - Note 2:
innodb_file_per_tableis enabled by default as of MySQL 5.6.6, thus you just need explicitly set its value to 1 for MySQL 5.5. - Note 3: by default,
innodb_buffer_pool_sizeandinnodb_buffer_pool_chunk_sizeare equal to 128M;innodb_buffer_pool_instances=1wheninnodb_buffer_pool_sizeis less than 1G, andinnodb_buffer_pool_instances=8wheninnodb_buffer_pool_sizeis equal to or greater than 1GB. If your system hardware allows, increase the value ofinnodb_buffer_pool_size, but it must be a multiple ofinnodb_buffer_pool_chunk_sizeandinnodb_buffer_pool_instances.
Increasing max_connections value for MySQL 5.6 and MySQL 5.7
Although you have set max_connections=800 in my.cnf or mysql.cnf file for MySQL 5.6 and MySQL 5.7, you may find the real value is limited to 214 on Ubuntu Server.
You can use below command to check the actual max_connections value:
- Type: mysql -h<mysql_hostname_or_ip_ address> -P<mysql_port> -u<globalsight_user_name> -p <globalsight_database_name> -e "show variables like 'max_connections';"
- Example: mysql -hlocalhost -P3306 -uglobalsight -p globalsight -e "show variables like 'max_connections';"
To increase the value of max_connections, follow below steps:
- Enable pam_limits.so for common session
- Edit and add below line in file /etc/pam.d/common-session
session required pam_limits.so
- Increase open file limitation for user mysql
- Edit and add below lines in file /etc/security/limits.conf
mysql hard nofile 4096mysql soft nofile 4096
- Note: If MySQL server has started already, you need restart it to make these settings take effect.
For Ubuntu Server 16.04 LTS, if MySQL 5.7 was installed as a systemd service daemon, please also do the following:
- Add below line under [Service] section in /lib/systemd/system/mysql.service file
LimitNOFILE=4096
- Reload the daemon
- Type: sudo systemctl daemon-reload
- Note: If MySQL server has started already, you need restart it to make these settings take effect.
Starting MySQL Database Server
Now you can start MySQL database server to further setup and testing.
- Type: sudo service mysql start
- Note 1: beginning with Ubuntu Server 15.04, you can also use command sudo systemctl start mysql.
- Note 2: the MySQL service name may be mysql.server if you didn't change the name when you copy support-files/mysql.server to /etc/init.d/ directory.
Setting password for MySQL root user
MySQL root user is not protected by password when installing MySQL with generic binary packages, you MUST set a password for root user after starting MySQL Server.
- Type: mysqladmin –u root password
- You will be prompted to enter the new password twice.
- Note: If you install MySQL by using generic binary package, but not append /usr/local/mysql/bin to system PATH variable, type command /usr/local/mysql/bin/mysqladmin -u root password instead.
You will be prompted to enter the new password twice to take effect.
Creating the GlobalSight database and user using the MySQL command line
The GlobalSight Installer cannot create database and user automatically, you should create them with MySQL command-line tool on Ubuntu Server.
To create the database and user using the MySQL command line:
- Log in to MySQL as root
- Type: mysql -uroot -p -h <mysql_hostname_or_ip_ address>
- You will be prompted to enter MySQL root user's password.
- If the MySQL root user password is not set, you can login to MySQL by
- Type: mysql -uroot -h <mysql_hostname_or_ip_ address>
- and grant the privileges and change the password for the root user.
- Type: grant all on *.* to 'root'@'localhost' identified by '<mysql_root_password>';
- Create the GlobalSight database
- Type: create database <globalsight_database_name>;
- Example: create database globalsight;
- Create a database user for GlobalSight
- Type: create user '<globalsight_user_name>'@'%' identified by '<globalsight_user_password>';
- Example: create user 'globalsight'@'%' identified by 'password';
- Note 1: this command also sets a password for the new created user.
- Note 2: you can omit @'%' in above create user command.
- Note 3: replace % with localhost, then that user can only connect to MySQL database on local system.
- Grant all privileges of the GlobalSight database created above to the database user created above
- Type: grant all on <globalsight_database_name>.* to '<globalsight_user_name>'@'%' identified by '<globalsight_user_password>';
- Type: flush privileges;
- Assume that your have created a database named “globalsight”, the user name is “globalsight”, and the password is “password”. Then, the command should be:
- Example: grant all on globalsight.* to 'globalsight'@'%' identified by 'password';
- Example: flush privileges;
- Note 1: You can omit identified by '<password>' in above grant command if you have set password for user 'globalsight'@'%' already.
- Note 2: Above create user and grant privileges command allow user 'globalsight' to remotely connect MySQL server from any network ip address. For security concerns, you can replace % with a specific ip address. Then only user from that ip address can remotely connect to the MySQL server.
- Example: create user 'globalsight'@'192.168.1.29' identified by 'password';
- Example: grant all on globalsight.* to 'globalsight'@'192.168.1.29';
- Commit the changes
- Type: commit;
- Exit MySQL
- Type: exit
Testing the MySQL setup
When MySQL installation and configuration described above are finished, test the setup to ensure MySQL works as expected.
To test the MySQL setup
- Log in to MySQL as the user created earlier. This example uses the MySQL user 'globalsight' with the password 'password'
- Type: mysql -u <globalsight_user_name> -p -h <mysql_hostname_or_ip_ address> -P <mysql_port>
- Example: mysql -uglobalsight -ppassword -hlocalhost -P 3306
- Note: for security concerns, do not include explicit password in command.
- Note 2: you can omit -h <mysql_hostname_or_ip_ address> -P <mysql_port> for localhost database with default 3306 port.
- If you recieve 'access denied 28000' error, review MySQL documentation here.
- Connect to the MySQL database created earlier. This example uses the database name 'globalsight'
- Type: use <globalsight_database_name>
- Example: use globalsight
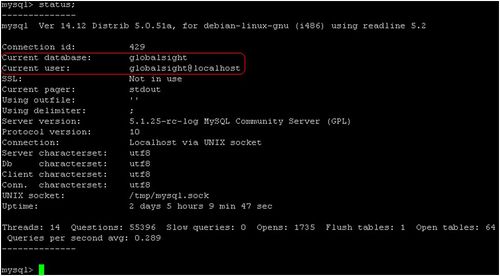
- Check the status
- Type: status
- Note: The status information for 'Current database:' and 'Current user:' should match the information entered above.
- You also use the MySQL username, password and database name later in the GlobalSight setup.
- Exit MySQL
- Type: exit
Installing JDK
The JDK package should be installed on the same server as the GlobalSight application. Oracle JDK 8 is incompatible with GlobalSight version prior to 8.6.3, you should install JDK 6 or JDK 7 instead.
To install JDK
- Download the latest supported version. You can also find the setup file in the GlobalSight Software Package
- Create the directory for Java, if it does not already exist
- Type: sudo mkdir /usr/local/java
- Unpack JDK package to directory for Java
- Type: cd /usr/local/java
- Type: sudo tar zxvf /path/to/jdk/package/jdk-8u45-linux-x64.tar.gz
- Remove the compressed JDK package
- Type: sudo rm /path/to/jdk/package/jdk-8u45-linux-x64.tar.gz
- Set system variables: JAVA_HOME and PATH
- Edit /etc/profile file and add contents as below:
export JAVA_HOME=/usr/local/java/jdk1.8.0_45export PATH=$PATH:$JAVA_HOME/bin
- Note: you need log in again for the new variable values to take effect.
