Difference between revisions of "GlobalSight Developer’s Guide"
(→Property files) |
Globalwiki (talk | contribs) m (1 revision) |
(No difference)
| |
Latest revision as of 03:39, 14 October 2014
Developers can also set up the GlobalSight development environment to develop further within it.
Contents
Client request life-cycle
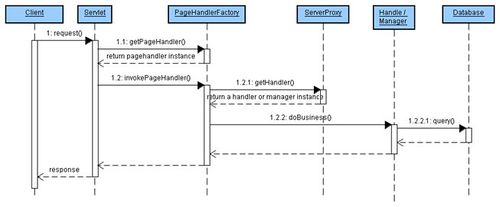
A typical client request lifecycle covers most of the core of the GlobalSight system. A summary sequence of a common request lifecycle looks as follows:
When a request comes in, the container chooses the corresponding servlet to handle it. The servlet then checks the configuration file to find the page handler for this special request. The page handler collects and pre-validates the necessary parameters from the request. The request data is then dispatched to the real business handler or manager, which is on the ServerProxy. The core business operation is done in the real handler or manager, including cooperation with the database.
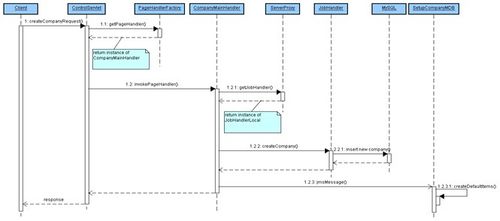
To show how to implement a feature in GlobalSight system, the operation of creating a company is taken as an example. The sequence goes as follows:
- Request the creation of the company: you can send a request from the web page if you login as super company administrator.
- Select Setup->Company
- Click New
- Enter the new company name and description, and then submit it
- The request is sent to our server. Take note of the URL string, for example http://localhost/globalsight/ControlServlet?linkName=save&pageName=COM2&action=create
- Find the corresponding servlet: as the URL suggests, this operation is handled by ControlServlet - a core servlet that mainly handles requests. Other servlets are declared in the web.xml.template file, such as ReportServlet, CapImportServlet and so on
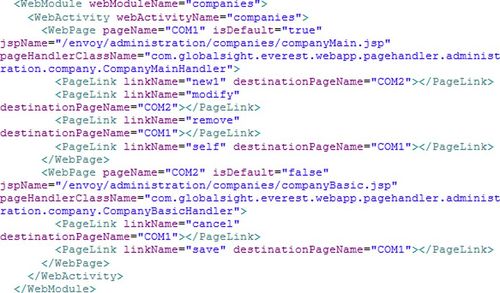
- Look up the page handler: the job of the servlet is to dispatch the request to a special page handler. The mapping between the request and the special page handler class are set in the configuration file EnvoyConfig.xml (main6\envoy\src\java\resources \EnvoyConfig.xml)
- To analyze the URL and find out the page handler, check for the “pageName” and “linkName” parameters in the URL. The page name specified the current page name and the link name specifies where to go from the current page
- The page name of the URL is COM2, and you can find this same page name in the second web page node. The link name is “save”, so check for this in the page link of the second web page node. You can find it at the last page link. The destination name is COM1, which refers to the first web page node. This URL actually points to the first web page node. The page handler of this request must be the page handler defined in the first web page node – CompanyMainHandler
- The servlet looks up the configuration mappings by request parameters to find out the page handler. All page handlers are created by PageHandlerFactory and contained in a map for reuse
- Invoke the page handler: each page handler must extend the class PageHandler, and rewrite the invokePageHandler method if needed. Servlets invoke this method to handle the request and return the response to the client
- Get the real handler: the page handler pre-validates the parameters and prepares the information needed for solving the request. The real business logic is done in a handler or a manager that can be found in the ServerProxy. For example, the request to create the company is handled by the JobHandler
- Solve business logic: the core business logic is done in a handler or in a manager. They can query the database, insert new data or any other operations needed for solving the request
- Asynchronous operations, if necessary: the request to create the company triggers a JMS message to create default items for the new company when the company is created successfully. GlobalSight uses JMS for asynchronous operations, if necessary.
Implementing a new feature is the same as the process for creating a company, as described above:
- Define the mapping between the page name and the page handler class in the configuration file
- Create a sub-class of PageHandler
- Dispatch the request to the real handler or manager to solve the business logic
- Create a message-driven bean for any asynchronous operation needed
Configuration
EnvoyConfig.xml file
The EnvoyConfig.xml file defines the mapping between the page name and the handler class.
- WebApplication is the root node of the envoy configuration file. It can contain one or more WebModules
| Property | Description |
|---|---|
| webAppName | Define a web application name |
- WebModule is a node that can only be written in a WebApplication target. It can contain one or more WebActivities
| Property | Description |
|---|---|
| webModuleName | Define a web module name |
- WebActivity is a sub-node of WebModule. It can contain one or more WebPages
| Property | Description |
|---|---|
| webActivityName | Define a web activity name |
- WebPage defines the mapping relationship, amount JSP file, page name and handler class. It is a sub-node of WebActivity and con contain zero or more PageLinks
| Property | Description | Note |
|---|---|---|
| pageName | Define a page name | This is used to specify this page |
| isDefault | Default flag | All Web pages contained in one Web activity must have one - and only one - Web page set to true |
| jspName | Associate with a JSP file | The path of the JSP file |
| pageHandlerClassName | Specify the handle class | The page handler that handles the special request |
- PageLink defines the forward path between Web pages. When the page name and link name match, the request is forwarded to the destination Web page to be handled
| Property | Description |
|---|---|
| linkName | Define a link name to forward |
| destinationPageName | Specify the name of the destination Web page |
Other configurations
The following will list out the configuration files for the special technology. Click the title of each for configuration details.
| File name | Path |
|---|---|
| ejb-jar.xml | main6\diplomat\dev\src\java\com\globalsight\cxe\adaptermdb\ |
| jboss.xml | main6\diplomat\dev\src\java\com\globalsight\cxe\adaptermdb\ |
| File name | Path |
|---|---|
| jbpm.cfg.xml | main6\envoy\src\java\ |
| hibernate-jbpm.cfg.xml.template | main6\envoy\src\java\ |
| File name | Path |
|---|---|
| hibernate.properties.template | main6\envoy\src\java\ |
| hibernate.cfg.xml | main6\envoy\src\java\ |
| Mapping files | main6\envoy\src\java\com\globalsight\persistence\hibernate\xml\ |
- SQL files
| File name | Path |
|---|---|
| SQL files | main6\envoy\schema\mysql\ |
| File name | Path |
|---|---|
| Jboss server | main6\tools\j2eeVendor\jboss\jboss_server\ |
| Configuration files | main6\tools\j2eeVendor\jboss\util\ |
| File name | Path |
|---|---|
| quartz.properties.template | main6\envoy\src\java\ |
Installation process
The installation process is a standalone program with no dependence on the GlobalSight system. This process is important, since it communicates with the end-user to set many important configuration properties. The process works with the property files as detailed below.
Property files
The whole installation process depends on the property files. This includes the number of pages to show, the display sequence, the number of parameters to show per page, the parameter types and so on. Most of the information is defined in the property files, as detailed in the table below.
All property files are in the main6/tools/install/data/ directory.
| File name | Description |
|---|---|
| installOrderUI.properties | The screen_list property defines the screen sequence.
Each screen name in this property needs a separate property to define the parameters and sequence on the screen itself. The parameters are separated by commas |
| installValueTypes.properties | This file defines the value type of the parameters and the method of input.
Select one parameter name from the property file above. Use the name to find the property, the value type being the value type of this parameters. For example, checkbox means string, and the input in the text field |
| installDisplay.properties | This file defines the label name of the parameters.
The parameter name is found in the first property file. Use the name to find the property in this file. The value is used as the label name on the screen |
| installDefaultValues.properties | This file defines default value of the parameters.
When running the installation process for the first time, this value is set to the parameter specified whose name matches the property name |
| installAmbassador.properties | This file contains some display sentences and page titles that are used by the special screen. |
| installUI.properties | This file contains some common screen properties and button names |
Template files
Template files are special files that are recreated after the installation process. They contain unknown parameters values that are set during the installation process. The installation process replaces the unknown parameters with those entered.
The unknown parameter follows a special pattern, such as “%%KEY%%”. The “KEY” must be the same in the installOrderUI.properties file. The double “%%” symbols around the key name tell the installation process to replace the value between them.
You can add your own template files to the Install.java file. Specify the name and path of the template file and the name and path of the new file. The installation process does this at the end of process.
Desktop Icon
Desktop icon is an extended tool for the GlobalSight system that simplifies tasks such as submitting and retrieving projects. It does this more quickly and easily than the browser-based GlobalSight application. Desktop Icon uses the Web services API that GlobalSight provides.
For instructions on installing and using the application, see Installing the GlobalSight Desktop Icon and Using the Desktop Icon.
The details below use desktop_home to refer to main6/envoy/src/webserviceClients/ambassador-desktop/desktopicon directory, the root directory for the Desktop Icon:
- Source code: all source code is in the desktop_home/src/ directory. The code is separate from the GlobalSight system, so you can develop them without the whole GlobalSight system
- Build: to build a whole desktop icon client, open a command window and forward to the desktop_home/tools directory. Use the following ant script to build it:A DesktopIcon.zip file is created in the desktop_home/build directory, if the target is successful. This file contains all files necessary for installing and executing the Desktop Icon
- Patch: to build the Desktop Icon program when a version has already been installed, you can either:
- Use the ant target make.app
- or execute the batch file ant.make.app.bat in the desktop_home/tools/ folder
- A new DesktopIcon directory is created in the desktop icon root directory. This folder contains all of the same files as that in the zip file built
- Copy the desktopicon.jar to the installation path of the existing Desktop Icon client
- Replace the old jar file in the installation root path


