Difference between revisions of "Installing GlobalSight on Ubuntu"
Globalwiki (talk | contribs) |
Globalwiki (talk | contribs) |
||
| (3 intermediate revisions by the same user not shown) | |||
| Line 1: | Line 1: | ||
{{Docset_side}} | {{Docset_side}} | ||
| − | This guide describes how to install GlobalSight application server on Ubuntu server. If not specified, the Ubuntu Server is 14.04 LTS version. This guide has been updated to cater for GlobalSight version 8.6. | + | This guide describes how to install GlobalSight application server on Ubuntu server. If not specified, the Ubuntu Server is 14.04 LTS version. This guide has been updated to cater for GlobalSight version 8.6.7. |
'''Important''': beginning with Ubuntu 15.04 version, system and service manager '''systemd''' is used as default system init daemon. Unfortunately, the GlobalSight daemon '''globalsight''' cannot work properly with '''systemd'''. Installing GlobalSight on Ubuntu Server 15.04 and above version is not recommended. | '''Important''': beginning with Ubuntu 15.04 version, system and service manager '''systemd''' is used as default system init daemon. Unfortunately, the GlobalSight daemon '''globalsight''' cannot work properly with '''systemd'''. Installing GlobalSight on Ubuntu Server 15.04 and above version is not recommended. | ||
| Line 10: | Line 10: | ||
* The current user has '''sudo''' privilege. | * The current user has '''sudo''' privilege. | ||
* The GlobalSight Software Package for Ubuntu has been downloaded and unzipped. | * The GlobalSight Software Package for Ubuntu has been downloaded and unzipped. | ||
| − | *: Type: '''jar xvf''' <i><tt style="background-color:#efffbf; white-space:nowrap;">GlobalSight_Software_Package_Linux_8.6. | + | *: Type: '''jar xvf''' <i><tt style="background-color:#efffbf; white-space:nowrap;">GlobalSight_Software_Package_Linux_8.6.7.zip</tt></i> |
Unzipping creates the following folders: | Unzipping creates the following folders: | ||
* 3rd_party_software | * 3rd_party_software | ||
| − | |||
* Converters | * Converters | ||
* DesktopIcon | * DesktopIcon | ||
| Line 56: | Line 55: | ||
# Update GlobalSight daemon template file <i><tt style="background-color:#efffbf; white-space:nowrap;"><globalsight_home_directory></tt></i><strong>/jboss/util/bin/service.sh.template</strong> | # Update GlobalSight daemon template file <i><tt style="background-color:#efffbf; white-space:nowrap;"><globalsight_home_directory></tt></i><strong>/jboss/util/bin/service.sh.template</strong> | ||
#: Insert <code style="border:1px; border-radius:3px; margin: 0 0px; padding:0px 0px; border:1px solid #bfcfff; background-color:#bfdfff; white-space:nowrap;"> -c ${JBOSS_USER} -d ${JBOSS_HOME}</code> between <code style="border:1px; border-radius:3px; margin: 0 0px; padding:0px 0px; border:1px solid #bfcfff; background-color:#bfdfff; white-space:nowrap;">--background</code> and <code style="border:1px; border-radius:3px; margin: 0 0px; padding:0px 0px; border:1px solid #bfcfff; background-color:#bfdfff; white-space:nowrap;">--user</code> | #: Insert <code style="border:1px; border-radius:3px; margin: 0 0px; padding:0px 0px; border:1px solid #bfcfff; background-color:#bfdfff; white-space:nowrap;"> -c ${JBOSS_USER} -d ${JBOSS_HOME}</code> between <code style="border:1px; border-radius:3px; margin: 0 0px; padding:0px 0px; border:1px solid #bfcfff; background-color:#bfdfff; white-space:nowrap;">--background</code> and <code style="border:1px; border-radius:3px; margin: 0 0px; padding:0px 0px; border:1px solid #bfcfff; background-color:#bfdfff; white-space:nowrap;">--user</code> | ||
| − | #: Example: <code style="border:1px; border-radius:3px; margin: 0 0px; padding:0px 0px; border:1px solid #bfcfff; background-color:#bfdfff | + | #: Example: <code style="border:1px; border-radius:3px; margin: 0 0px; padding:0px 0px; border:1px solid #bfcfff; background-color:#bfdfff;">start-stop-daemon --start --quiet --background -c ${JBOSS_USER} -d ${JBOSS_HOME} --user ${JBOSS_USER} --exec ${JBOSS_HOME}/bin/standalone.sh</code> |
| − | #: Example: <code style="border:1px; border-radius:3px; margin: 0 0px; padding:0px 0px; border:1px solid #bfcfff; background-color:#bfdfff | + | #: Example: <code style="border:1px; border-radius:3px; margin: 0 0px; padding:0px 0px; border:1px solid #bfcfff; background-color:#bfdfff;">start-stop-daemon --start --quiet --background -c ${JBOSS_USER} -d ${JBOSS_HOME} --user ${JBOSS_USER} --exec ${JBOSS_HOME}/bin/jboss-cli.sh -- --connect command=:shutdown</code> |
#: Note: this modification ensures that GlobalSight daemon are always running as user '''jboss'''. | #: Note: this modification ensures that GlobalSight daemon are always running as user '''jboss'''. | ||
| Line 459: | Line 458: | ||
*#: <code style="border:1px; border-radius:3px; margin: 0 0px; padding:0px 0px; border:1px solid #bfcfff; background-color:#bfdfff; white-space:nowrap;">wins server = <wins_server_ip_address></code>, replace ''<tt style="background-color:#efffbf; white-space:nowrap;"><wins_server_ip_address></tt>'' with the real ip address of WINS server | *#: <code style="border:1px; border-radius:3px; margin: 0 0px; padding:0px 0px; border:1px solid #bfcfff; background-color:#bfdfff; white-space:nowrap;">wins server = <wins_server_ip_address></code>, replace ''<tt style="background-color:#efffbf; white-space:nowrap;"><wins_server_ip_address></tt>'' with the real ip address of WINS server | ||
*# Set shared directory that GlobalSight converters will use for processing files | *# Set shared directory that GlobalSight converters will use for processing files | ||
| − | *#: <code style="border:1px; border-radius:3px; margin: 0 0px; padding:0px 0px; border:1px solid #bfcfff; background-color:#bfdfff; white-space:nowrap;">[Name]</code>, replace ''<tt style="background-color:#efffbf; white-space:nowrap;">Name</tt>'' with a meaningful name of your shared directory | + | *#: <code style="border:1px; border-radius:3px; margin: 0 0px; padding:0px 0px; border:1px solid #bfcfff; background-color:#bfdfff; white-space:nowrap;">[<Name>]</code>, replace ''<tt style="background-color:#efffbf; white-space:nowrap;"><Name></tt>'' with a meaningful name of your shared directory |
*#: <code style="border:1px; border-radius:3px; margin: 0 0px; padding:0px 0px; border:1px solid #bfcfff; background-color:#bfdfff; white-space:nowrap;">path = /path/to/conversion/directory</code>, the absolute path to conversion directory, and it should matches the directory settings when you install GlobalSight | *#: <code style="border:1px; border-radius:3px; margin: 0 0px; padding:0px 0px; border:1px solid #bfcfff; background-color:#bfdfff; white-space:nowrap;">path = /path/to/conversion/directory</code>, the absolute path to conversion directory, and it should matches the directory settings when you install GlobalSight | ||
*#: <code style="border:1px; border-radius:3px; margin: 0 0px; padding:0px 0px; border:1px solid #bfcfff; background-color:#bfdfff; white-space:nowrap;">browseable = yes</code> | *#: <code style="border:1px; border-radius:3px; margin: 0 0px; padding:0px 0px; border:1px solid #bfcfff; background-color:#bfdfff; white-space:nowrap;">browseable = yes</code> | ||
| Line 466: | Line 465: | ||
*#: <code style="border:1px; border-radius:3px; margin: 0 0px; padding:0px 0px; border:1px solid #bfcfff; background-color:#bfdfff; white-space:nowrap;">force user = jboss</code> | *#: <code style="border:1px; border-radius:3px; margin: 0 0px; padding:0px 0px; border:1px solid #bfcfff; background-color:#bfdfff; white-space:nowrap;">force user = jboss</code> | ||
*#: <code style="border:1px; border-radius:3px; margin: 0 0px; padding:0px 0px; border:1px solid #bfcfff; background-color:#bfdfff; white-space:nowrap;">hosts allow = <allowed_ip_addresses></code>, replace ''<tt style="background-color:#efffbf; white-space:nowrap;"><allowed_ip_addresses></tt>'' with real ip addresses, for example, 192.168.1.0/24 allows connections from private networks 192.168.1. | *#: <code style="border:1px; border-radius:3px; margin: 0 0px; padding:0px 0px; border:1px solid #bfcfff; background-color:#bfdfff; white-space:nowrap;">hosts allow = <allowed_ip_addresses></code>, replace ''<tt style="background-color:#efffbf; white-space:nowrap;"><allowed_ip_addresses></tt>'' with real ip addresses, for example, 192.168.1.0/24 allows connections from private networks 192.168.1. | ||
| − | *#: <code style="border:1px; border-radius:3px; margin: 0 0px; padding:0px 0px; border:1px solid #bfcfff; background-color:#bfdfff; white-space:nowrap;">hosts deny = <denied_ip_addresses></code>, replace ''<tt style="background-color:#efffbf; white-space:nowrap;">< | + | *#: <code style="border:1px; border-radius:3px; margin: 0 0px; padding:0px 0px; border:1px solid #bfcfff; background-color:#bfdfff; white-space:nowrap;">hosts deny = <denied_ip_addresses></code>, replace ''<tt style="background-color:#efffbf; white-space:nowrap;"><denied_ip_addresses></tt>'' with real ip addresses, for example, 0.0.0.0/0 refuses all connections from other computers. |
| − | ** The whole settings are as | + | ** The whole settings are as follows: |
**: <code style="border:1px; border-radius:3px; margin: 0 0px; padding:0px 0px; border:1px solid #bfcfff; background-color:#bfdfff; white-space:nowrap;">[global]</code> | **: <code style="border:1px; border-radius:3px; margin: 0 0px; padding:0px 0px; border:1px solid #bfcfff; background-color:#bfdfff; white-space:nowrap;">[global]</code> | ||
**: <code style="border:1px; border-radius:3px; margin: 0 0px; padding:0px 0px; border:1px solid #bfcfff; background-color:#bfdfff; white-space:nowrap;">workgroup = GLOBALSIGHT</code> | **: <code style="border:1px; border-radius:3px; margin: 0 0px; padding:0px 0px; border:1px solid #bfcfff; background-color:#bfdfff; white-space:nowrap;">workgroup = GLOBALSIGHT</code> | ||
| Line 478: | Line 477: | ||
**: <code style="border:1px; border-radius:3px; margin: 0 0px; padding:0px 0px; border:1px solid #bfcfff; background-color:#bfdfff; white-space:nowrap;">guest ok = yes</code> | **: <code style="border:1px; border-radius:3px; margin: 0 0px; padding:0px 0px; border:1px solid #bfcfff; background-color:#bfdfff; white-space:nowrap;">guest ok = yes</code> | ||
**: <code style="border:1px; border-radius:3px; margin: 0 0px; padding:0px 0px; border:1px solid #bfcfff; background-color:#bfdfff; white-space:nowrap;">force user = jboss</code> | **: <code style="border:1px; border-radius:3px; margin: 0 0px; padding:0px 0px; border:1px solid #bfcfff; background-color:#bfdfff; white-space:nowrap;">force user = jboss</code> | ||
| − | **: <code style="border:1px; border-radius:3px; margin: 0 0px; padding:0px 0px; border:1px solid #bfcfff; background-color:#bfdfff; white-space:nowrap;">hosts allow = 127.0.0.1 | + | **: <code style="border:1px; border-radius:3px; margin: 0 0px; padding:0px 0px; border:1px solid #bfcfff; background-color:#bfdfff; white-space:nowrap;">hosts allow = 127.0.0.1 192.168.1.0/24</code> |
**: <code style="border:1px; border-radius:3px; margin: 0 0px; padding:0px 0px; border:1px solid #bfcfff; background-color:#bfdfff; white-space:nowrap;">hosts deny = 0.0.0.0/0</code> | **: <code style="border:1px; border-radius:3px; margin: 0 0px; padding:0px 0px; border:1px solid #bfcfff; background-color:#bfdfff; white-space:nowrap;">hosts deny = 0.0.0.0/0</code> | ||
**: Note: the '''jboss''' user must have the read/write privileges for the shared directory. | **: Note: the '''jboss''' user must have the read/write privileges for the shared directory. | ||
Latest revision as of 23:35, 13 April 2016
This guide describes how to install GlobalSight application server on Ubuntu server. If not specified, the Ubuntu Server is 14.04 LTS version. This guide has been updated to cater for GlobalSight version 8.6.7.
Important: beginning with Ubuntu 15.04 version, system and service manager systemd is used as default system init daemon. Unfortunately, the GlobalSight daemon globalsight cannot work properly with systemd. Installing GlobalSight on Ubuntu Server 15.04 and above version is not recommended.
Contents
- 1 Prerequisites
- 2 Installing the GlobalSight core application
- 3 Configuring GlobalSight Web Services (optional)
- 4 Configuring Samba server (optional)
- 5 Installing the Microsoft Office Converters
- 6 Installing the Adobe InDesign and Illustrator converters
- 7 Installing the FrameMaker 9 Converter
- 8 Starting and stopping GlobalSight
- 9 Logging in to GlobalSight
- 10 Uninstalling GlobalSight
Prerequisites
- The GlobalSight software package for Ubuntu has been downloaded as described in Installing GlobalSight.
- Third-party components have been installed as described in Installing Third-party Components for GlobalSight on Ubuntu.
- The current user has sudo privilege.
- The GlobalSight Software Package for Ubuntu has been downloaded and unzipped.
- Type: jar xvf GlobalSight_Software_Package_Linux_8.6.7.zip
Unzipping creates the following folders:
- 3rd_party_software
- Converters
- DesktopIcon
- GlobalSight
Some features in GlobalSight require running Java plugin on browsers, but now they cannot work on lately Google Chrome and Mozilla Firefox versions. We recommend using Microsoft Internet Explorer to perform related jobs. These Java Applet components will be removed from GlobalSight gradually.
Installing the GlobalSight core application
Pre-installation procedures
- Ensure that
$JAVA_HOMEis in yourPATHvariable- Type: echo $JAVA_HOME
- The expected result should look like below:
- Example: /usr/local/java/jdk1.8.0_45
- Type: echo $PATH
- The expected result should look like below:
- Example: /usr/local/sbin:/usr/local/bin:/usr/sbin:/usr/bin:/sbin:/bin:/usr/games:/usr/local/games:/usr/local/java/jdk1.8.0_45/bin
- Ensure that you can access the GlobalSight database from the MySQL command line tool. The GlobalSight installer uses command 'mysql' to connect to the MySQL database server and to create tables for the GlobalSight application.
- Type: mysql -u <globalsight_user_name> -p <globalsight_database_name> -h <mysql_hostname_or_ip_ address> -P <mysql_port>
- Example: MySQL -uglobalsight -p globalsight -hlocalhost -P 3306
- Create a user called jboss for the GlobalSight core application
- Type: sudo useradd -m -s /bin/bash jboss
- Type: sudo passwd jboss
- Type: sudo adduser jboss sudo
- Log in as user jboss
- Type: su -l jboss
- Unjar GlobalSight.zip to /home/jboss directory
- Type: mkdir GlobalSight && cd GlobalSight
- Type: jar xvf /path/to/GlobalSight.zip
- Go to the install script directory and add the executable attribute to script file Install.sh
- Type: cd <globalsight_home_directory>/install
- Example: cd /home/jboss/GlobalSight/install
- Type: chmod u+x Install.sh
- Note: we will call the GlobalSight core application directory as <globalsight_home_directory> later.
- Create GlobalSight documents and file storage directory
- Type: mkdir -p /path/to/globalsight/docs/and/filestorage/directory
- Assume that we create two directories named 'docs' and 'filestorage' under directory '/home/jboss/welocalize/', the command will be:
- Example: mkdir -p /home/jboss/welocalize/{docs,filestorage}
- If you also need create directory for GlobalSight converters, you can use command like below:
- Example: mkdir -p /home/jboss/welocalize/{docs,filestorage,winfiles}
- Note: we will call the documents directory as <globalsight_document_directory>, and file storage directory as <globalsight_filestorage_directory> later.
- Update GlobalSight daemon template file <globalsight_home_directory>/jboss/util/bin/service.sh.template
- Insert
-c ${JBOSS_USER} -d ${JBOSS_HOME}between--backgroundand--user - Example:
start-stop-daemon --start --quiet --background -c ${JBOSS_USER} -d ${JBOSS_HOME} --user ${JBOSS_USER} --exec ${JBOSS_HOME}/bin/standalone.sh - Example:
start-stop-daemon --start --quiet --background -c ${JBOSS_USER} -d ${JBOSS_HOME} --user ${JBOSS_USER} --exec ${JBOSS_HOME}/bin/jboss-cli.sh -- --connect command=:shutdown - Note: this modification ensures that GlobalSight daemon are always running as user jboss.
- Insert
Installing GlobalSight core application
- Run the install script
- Type: sudo PATH=$JAVA_HOME/bin:$PATH ./Install.sh
- Note: you can expand above command to sudo PATH=$JAVA_HOME/bin:$PATH ./Install.sh | tee globalsight_install.log. The command redirects output on the Console to file globalsight_install.log. It may help you identify errors if GlobalSight installation fails.
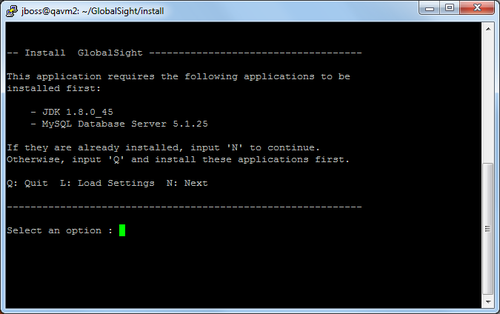
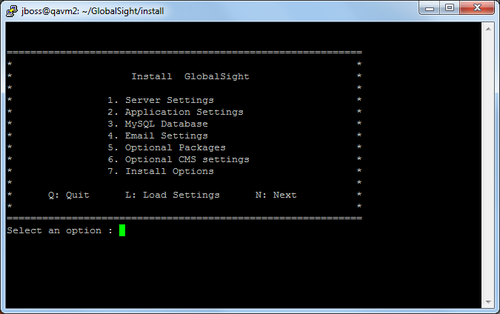
The GlobalSight Installation interface starts.
On the Install GlobalSight menu screen, type N to go to the next screen.
Entering the server settings
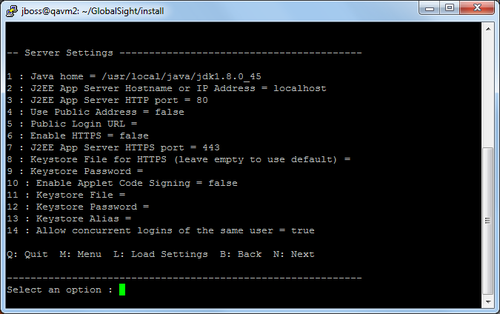
On Server Settings screen, enter the installation parameters as required and then type N to go to the next screen. Use the table below as a guide.
- Note: An active internet connection is required to sign code for Java Applet components.
| Parameter | Description |
|---|---|
| Java home | The JAVA_HOME to run the GlobalSight application server
|
| J2EE App Server Hostname or IP Address | The name of the server on which you installed the GlobalSight application server. Enter the fully qualified name of the host, for example, machine.domain.com or localhost
Default: localhost |
| J2EE App Server HTTP port | The web server HTTP port for the application server
Default: 80 |
| Use Public Address | Flag (true or false) to use a public address for the GlobalSight application server to log in
Default: false |
| Public Login URL | The public login URL for the GlobalSight application server. It is ignored when above Use Public Address option is false |
| Enable HTTPS | Flag (true or false) to enable HTTPS for the GlobalSight application server
Default: false |
| J2EE App Server HTTPS port | The web server HTTPS port for the App Server. This value is ignored when above Enable HTTPS option is false
Default: 443 |
| Keystore File for HTTPS(leave empty to use default) | The keystore file for HTTPS authentication. This value is ignored when above Enable HTTPS option is false
Default: empty. |
| Keystore Password | The keystore file's password/passphrase for HTTPS authentication. This value is ignored when above Enable HTTPS option is false
Default: empty. |
| Enable Applet Code Signing | Flag (true or false) to enable signing code for Java Applet components
Default: false |
| Keystore File | The keystore file for signing code. This value is ignored when above Enable Applet Code Signing option is false
Default: empty |
| Keystore Password | The keystore file's password/passphrase for signing code. This value is ignored when above Enable Applet Code Signing option is false
Default: empty |
| Keystore Alias | The keystore alias for signing code. This value is ignored when above Enable Applet Code Signing option is false
Default: empty |
| Allow concurrent logins of the same user | Flag (true or false) to allow concurrent logins of the same user. If set to false, you cannot login twice (concurrently) with the same username. If you want to login as the second user, the first user must log out or you must wait for their session to time out.
Default: true |
Entering the application settings
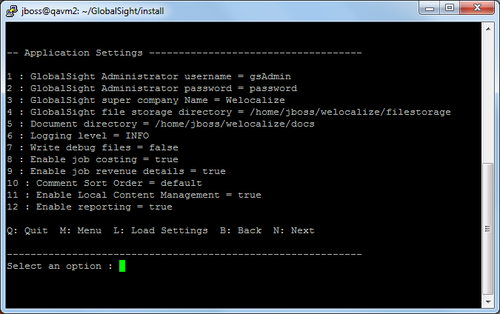
On Application Settings screen, enter the installation parameters as required and then type N to go to the next screen. Use the table below as a guide.
| Parameter | Description |
|---|---|
| GlobalSight Administrator username | The administrator user used for first login to GlobalSight and for creating all other users initially
Default: gsAdmin |
| GlobalSight Administrator password | The password of the GlobalSight Administrator user
Default: password |
| GlobalSight Super Company Name | The name of the super company of GlobalSight
Default: Welocalize |
| GlobalSight file storage directory | This is a permanent directory that GlobalSight uses to store temporary files.
Note: The jboss user must have the write privilege to the directory you choose |
| Document directory | This is directory that localization files are imported from and exported to
Note: The jboss user must have the write privilege to the directory you choose |
| Logging level | The information level that logged into files.
Default: INFO |
| Write debug files | Flag (true or false) to enable writing to the debug directory
Default: false |
| Enable Job Costing | Flag (true or false) to enable the Job Costing feature
Default: true |
| Enable job revenue details | Flag (true or false) to show detailed revenues
Default: true |
| Comment Sort Order | Default: default |
| Enable Local Content Management | Flag (true or false) to enable the Local Content Management feature
Default: true |
| Enable reporting | Default: Flag (true or false) to enable the Reporting feature
Default: true |
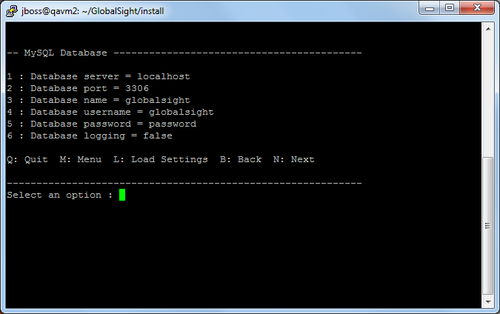
Entering the MySQL database settings
On MySQL Database screen, enter the installation parameters as required and then type N to go to the next screen. Use the table below as a guide.
| Parameter | Description |
|---|---|
| Database server | The server name or the IP address that MySQL database is installed. For example: db_server.domain.com or 192.168.1.29 or localhost
Default: localhost |
| Database port | The port of MySQL database server
Default: 3306 |
| Database name | The name of the GlobalSight database that you want to connect to
Default: globalsight |
| Database username | The GlobalSight database's username
Default: globalsight |
| Database password | The password for the above database user
Default: password |
| Database logging | Flag (true or false) to enable the logging of Hibernate queries and/or other database related information
Default: false |
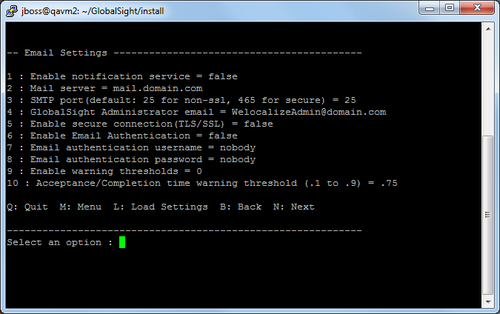
Entering the Email settings
On Email Settings screen, enter the installation parameters as required and then type N to go to the next screen. Use the table below as a guide.
| Parameter | Description |
|---|---|
| Enable notification service | Flag (true or false) to enable the Email Notification feature of GlobalSight. All followed options on this screen are ignored when it is false
Default: false |
| Mail server | The fully qualified hostname of mail server, for example mail.domain.com
Default: mail.domain.com |
| SMTP port (default: 25 for non-ssl, 465 for secure) | The SMTP port for the mail server
Default: 25 |
| GlobalSight Administrator email | The email address of the GlobalSight administrator user. When something goes wrong in the system, this person gets an notification email
Default: WelocalizeAdmin@domain.com |
| Enable secure connection(TLS/SSL) | Flag (true or false) to enable secure connection
Default: false |
| Enable Email Authentication | Flag (true or false) to enable the Email Authentication feature of GlobalSight. This value should be true when the mail server used by GlobalSight requires authentication Default: false |
| Email authentication username | The mail server user that is used to authenticate all email sent from GlobalSight. This is a special mail server user created just for GlobalSight email authentication purposes. You must add this user to the mail server that you specified above
Note: The username is not the username of the sender of GlobalSight email, since GlobalSight emails can be sent from multiple users
This value is ignored if above Enable Email Authentication option is false |
| Email authentication password | The password for the email authentication user above
This value is ignored if above Enable Email Authentication option is false |
| Enable warning thresholds | This enables Job Acceptance/Completion warning thresholds
Default: false |
| Acceptance/Completion time warning threshold | The time when the Acceptance or Completion warning email should be sent. The value is the time elapsed in percent between:
This value is ignored if above Enable warning thresholds option is false |
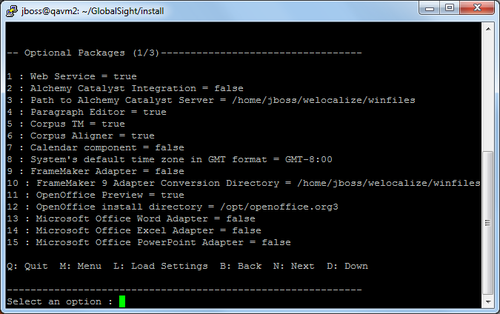
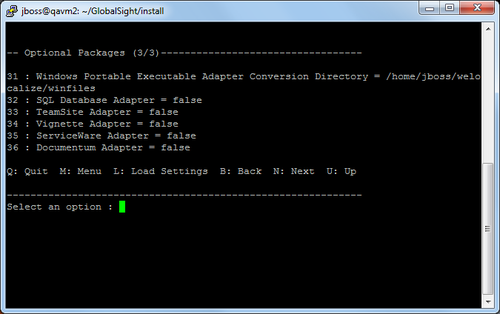
Entering optional package settings
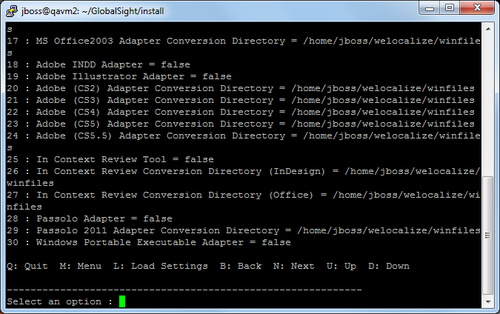
On Optional Packages screen, type D to scroll down the screen.
- You will see more settings
- and then type D to show the left
Enter the installation parameters as required and then type N to go to the next screen. Use the table below as a guide.
| Parameter | Description |
|---|---|
| Web Service | This option enables the Web Service capability of GlobalSight. Web Service API calls will not work if it is false
Default: true |
| Alchemy Catalyst Integration | This option enables the Alchemy Catalyst Integration capability of GlobalSight. Alchemy Catalyst Integration does not work if it is false
Default: false |
| Path to Alchemy Catalyst Server | This value is ignored if above Alchemy Catalyst Integration option is false. The jboss user must have the write privilege to the directory you choose |
| Paragraph Editor | This option enables the Paragraph Editor feature of GlobalSight. The Paragraph Editor does not work if it is false
Default: true |
| Corpus TM | This option enables the Corpus TM capability of GlobalSight. Corpus TM will be deprecated in future GlobalSight version
Default: true |
| Corpus Aligner | This option enables the Corpus Aligner capability of GlobalSight. Corpus Aligner does not work if it is false.
Default: true |
| Calendar component | This option enables the Calendar capability of GlobalSight. Calendar does not work if it is false
Default: false |
| System's default time zone in GMT format (i.e. GMT-8:00 for US) | This option sets the timezone used by GlobalSight for all time and date calculations. This value is expressed in hours from Greenwich Mean Time. The default timezone is set to GMT-8, which is Pacific Standard Time for the West Coast of the US and Canada
Default: GMT-8:00 |
| FrameMaker Adapter | This option enables GlobalSight to work with Adobe FrameMaker 9. The adapter does not work if this is false
Default: false |
| FrameMaker 9 Adapter Conversion Directory | The directory that the FrameMaker 9 Converter uses for file processing. This value is ignored if above FrameMaker Adapter option is false
Default: /home/jboss/welocalize/winfiles |
| OpenOffice Preview | This option enables GlobalSight to work with OpenOffice to file preview. The option is not applicable to Ubuntu Server
Default: true |
| OpenOffice install directory | The directory where OpenOffice3 is installed. The option is not applicable to Ubuntu Server
Default: /opt/openoffice.org3 |
| Microsoft Office Word Adapter | This option enables GlobalSight to work with Microsoft Word 2003/2007. The adapter does not work if it is false
Default: false |
| Microsoft Office Excel Adapter | This option enables GlobalSight to work with Microsoft Excel 2003/2007. The adapter does not work if it is false
Default: false |
| Microsoft Office PowerPoint Adapter | This option enables GlobalSight to work with Microsoft PowerPoint 2003/2007. The adapter does not work if it is false
Default: false |
| MS Office 2007 Adapter Conversion Directory | The directory that the GlobalSight MS Office 2007 converter uses for file processing. This value is ignored if none of Microsoft Office Word / Excel / PowerPoint Adapter is true
Note: The jboss user must have the write privilege to the directory you choose |
| MS Office 2003 Adapter Conversion Directory | The directory that the GlobalSight MS Office 2003 converter uses for file processing. This value is ignored if none of Microsoft Office Word / Excel / PowerPoint Adapter is true
Note: The jboss user must have the write privilege to the directory you choose |
| Adobe INDD Adapter | This option enables GlobalSight to work with Adobe InDesign. The adapter does not work if it is false
Default: false If this option is set to true, you need to set up the converter for it. For instructions, see Installing the Adobe InDesign and Illustrator converters section below of this document |
| Adobe Illustrator Adapter | This option enables GlobalSight to work with Adobe Illustrator CS2. The adapter does not work if it is false
Default: false |
| Adobe(CS2) Adapter Conversion Directory | The directory that the GlobalSight Adobe InDesign CS2 converter uses for file processing. This value is ignored if above Adobe INDD Adapter option is false
Note: The jboss user must have the write privilege to the directory you choose |
| Adobe(CS3) Adapter Conversion Directory | The directory that the GlobalSight Adobe InDesign CS3 converter uses for file processing. This value is ignored if above Adobe INDD Adapter option is false
Note: The jboss user must have the write privilege to the directory you choose |
| Adobe(CS4) Adapter Conversion Directory | The directory that the GlobalSight Adobe InDesign CS4 converter uses for file processing. This value is ignored if above Adobe INDD Adapter option is false
Note: The jboss user must have the write privilege to the directory you choose |
| Adobe(CS5) Adapter Conversion Directory | The directory that the GlobalSight Adobe InDesign CS5 converter uses for file processing. This value is ignored if above Adobe INDD Adapter option is false
Note: The jboss user must have the write privilege to the directory you choose |
| Adobe(CS5.5) Adapter Conversion Directory | The directory that the GlobalSight Adobe InDesign CS5.5 converter uses for file processing. This value is ignored if above Adobe INDD Adapter option is false
Note: The jboss user must have the write privilege to the directory you choose |
| In Context Review Tool | This option enables GlobalSight to work with Adobe InDesign CC 2015 and Microsoft Office 2010 for In-context review feature.
Default: false |
| In Context Review Conversion Directory (InDesign) | The directory that the GlobalSight Adobe InDesign CC 2015 converter uses for file processing. This value is ignored if above In Context Review Tool option is false
Note: The jboss user must have the write privilege to the directory you choose |
| In Context Review Conversion Directory (Office) | The directory that the GlobalSight MS Office 2010 converter uses for file processing. This value is ignored if above In Context Review Tool option is false
Note: The jboss user must have the write privilege to the directory you choose |
| Passolo Adapter | This option enables GlobalSight to work with SDL Passolo 2011. The adapter does not work if it is false
Default: false |
| Passolo 2011 Adapter Conversion Directory | The directory that the GlobalSight Passolo 2011 converter uses for file processing. This value is ignored if above Passolo Adapter option is false
Note: The jboss user must have the write privilege to the directory you choose |
| Windows Portable Executable Adapter | This option enables GlobalSight to work with .Net Fromework to handle Dynamic Link Library(.dll) files and execuable(.exe) files. The adapter does not work if it is false
Default: false |
| Windows Portable Executable Adapter Conversion Directory | The directory that the GlobalSight Portable Executable converter uses for file processing. This value is ignored if above Windows Portable Executable Adapter option is false
Note: The jboss user must have the write privilege to the directory you choose |
| SQL Database Adapter | This option enables the Database Integration feature of GlobalSight
Default: false |
| TeamSite Adapter | This option enables the TeamSite integration feature of GlobalSight
Default: false |
| Vignette Adapter | This option enables the Vignette integration feature of GlobalSight
Default: false |
| ServiceWare Adapter | This option enables the ServiceWare integration feature of GlobalSight
Default: false |
| Documentum Adapter | This option enables the Documentum integration feature of GlobalSight
Default: false |
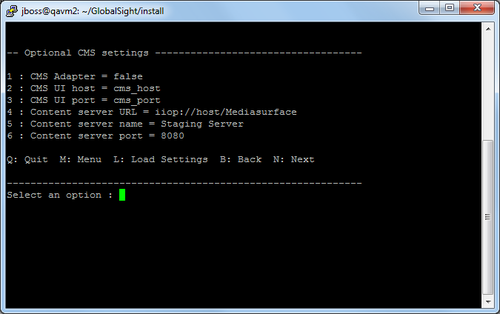
Entering the optional CMS settings
On Optional CMS settings screen, enter the installation parameters as required and then type N to go to the next screen. Use the table below as a guide.
| Parameter | Description |
|---|---|
| CMS Adapter | This option enables the CMS integration feature of GlobalSight. The CMS adapter does not work if this is false
Default: false |
| CMS UI host | The hostname of the machine where the CMS UI is running, for example "tempest"
Default: cms_host |
| CMS UI port | The port that is used to display the CMS UI. For example, if the CMS module is deployed in Tomcat, then typically this is 8080 by default
Default: cms_port |
| Content server URL | An IIOP or RMI URL that can be used to connect to the MAE (Mediasurface Application Engine). If the MAE is deployed on the machine "tempest", then an example value is: iiop://tempest/Mediasurface
Default: iiop://host/Mediasurface |
| Content server name | The name of a "Content Server" object configured within the CMS. For example "Staging Server", "Live Server", and so on. GlobalSight is set up to localize content from this content server
Default: Staging Server |
| Content server port | The port of the specified Content Server. For example, "8080". If JSP templates are being used, then this is typically the same as the CMS UI port
Default: 8080 |
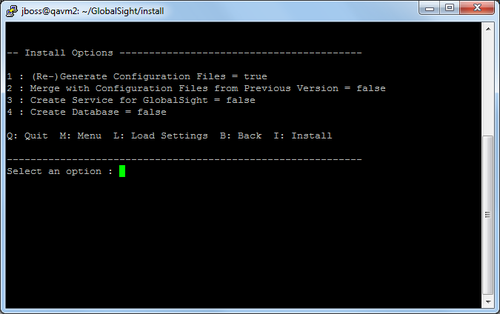
Finishing the installation
On Install Options screen, set option 1, 3 and 4 to true (for a fresh GlobalSight installation).
- Note: Option 4 creates database tables for the GlobalSight application. The installer will drop and recreate exiting tables for the GlobalSight application. If this is not your first attempt to install GlobalSight, setting option 4 to 'true' will cause data loss.
- Type I to start the installation
- Press Enter after installation to exit
GlobalSight core application now is installed.
Check the console for any errors that may have arisen during creation of the database. If you have appended | tee globalsight_install.log to command sudo PATH=$JAVA_HOME/bin:$PATH ./Install.sh, you can find the log file in current directory to see what fails during installation.
Post-installation procedures
Change the ownership of GlobalSight application
- Set jboss as the owner of GlobalSight application server
- Type: sudo chown -R jboss:jboss <globalsight_home_directory>
- Example: sudo chown -R jboss:jboss /home/jboss/GlobalSight
- Set jboss as the owner of GlobalSight documents and file storage directory
- Type: sudo chown -R jboss:jboss <globalsight_document_directory>
- Type: sudo chown -R jboss:jboss <globalsight_filestorage_directory>
- Example: sudo chown -R jboss:jboss /home/jboss/welocalize/docs
- Example: sudo chown -R jboss:jboss /home/jboss/welocalize/filestorage
Set the start and stop service script executable
- Type: sudo chmod u+x <globalsight_home_directory>/jboss/server/bin/standalone.sh
- Example: sudo chmod u+x /home/jboss/GlobalSight/jboss/server/bin/standalone.sh
- Type: sudo chmod u+x <globalsight_home_directory>/jboss/server/bin/jboss-cli.sh
- Example: sudo chmod u+x /home/jboss/GlobalSight/jboss/server/bin/jboss-cli.sh
Configuring GlobalSight Web Services (optional)
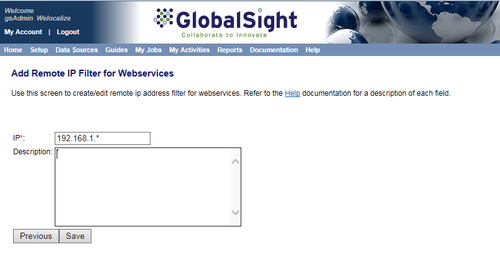
The Web services API allows any client, regardless of implementation technology or operating system, to connect and exchange data with GlobalSight. Thus you can specify the IP addresses that are allowed to connect to GlobalSight.
To configure IP filters for Web services
- Log in to the GlobalSight as super administrator user
- Click Remote IP Filter for Webservices on home page
- Click New to add the remote IP address information
- Note: You can use an asterisk (*) as a wildcard in IP addresses. For example, the IP address 192.168.1.* allows all network IP addresses that begin with 192.168.1 to use GlobalSight Web services.
- Click Save
When create a new company, make sure that Enable IP Filter option is enabled. Then IP filters will take effect for that company.
Configuring Samba server (optional)
To work with GlobalSight converters installed on Windows system, you may need configure a Samba server to share files on Ubuntu server.
Prerequisites
- Make sure Samba server is installed
- Type: smbd -V
- To install Samba server
- Type: sudo apt-get -y install samba
- The current user has sudo privilege to modify Samba configuration file
To configure Samba
The main configuration file for Samba server is /etc/samba/smb.conf. You need sudo privilege to edit it.
Samba configuration varies as different network and security levels.
- Below example assume that your GlobalSight application works in a Windows workgroup. And only computers installed the converters can connect to GlobalSight application server.
- Update or add below lines under [global] section
workgroup = <your_workgroup_name>, replace <your_workgroup_name> with the real workgroup namenetbios name = <hostname>, replace <hostnamee> with the short hostname of Ubuntu serversecurity = userwins server = <wins_server_ip_address>, replace <wins_server_ip_address> with the real ip address of WINS server
- Set shared directory that GlobalSight converters will use for processing files
[<Name>], replace <Name> with a meaningful name of your shared directorypath = /path/to/conversion/directory, the absolute path to conversion directory, and it should matches the directory settings when you install GlobalSightbrowseable = yeswriteable = yesguest ok = yesforce user = jbosshosts allow = <allowed_ip_addresses>, replace <allowed_ip_addresses> with real ip addresses, for example, 192.168.1.0/24 allows connections from private networks 192.168.1.hosts deny = <denied_ip_addresses>, replace <denied_ip_addresses> with real ip addresses, for example, 0.0.0.0/0 refuses all connections from other computers.
- The whole settings are as follows:
[global]workgroup = GLOBALSIGHTnetbios name = GSVM1security = userwins server = 192.168.1.1[converter1]browseable = yeswriteable = yesguest ok = yesforce user = jbosshosts allow = 127.0.0.1 192.168.1.0/24hosts deny = 0.0.0.0/0- Note: the jboss user must have the read/write privileges for the shared directory.
- Update or add below lines under [global] section
- Another example allows Samba connection with user authentication, only user jboss allowed.
[global]workgroup = GLOBALSIGHTnetbios name = GSVM2security = userencrypt passwords = yesvalid users = jbosswins server = 192.168.1.1[converter2]browseable = yeswriteable = yesguest ok = no- Note: you should set a Samba connection password for user jboss, make sure it differs from the password for system login.
- Type: sudo smbpasswd -d jboss
- Verify no errors in the configuration
- Type: testparm /etc/samba/smb.conf
- Restart Samba to make the configuration take effect
- Type: sudo service smbd restart
- Verify the shared directory in Windows Explorer
- Type the following link in Windows Explorer to open the shared folder
- \\<ubuntu_server_hotname_or_ip>\<shared_folder_name>
- Example: \\192.168.1.29\converter
If your GlobalSight application server is a domain member of your organization, read Part II. Server Configuration Basics - Chapter 6. Domain Membership for the Samba configuration example.
Installing the Microsoft Office Converters
For details, see Installing the Microsoft Office converters.
Installing the Adobe InDesign and Illustrator converters
To run the Adobe InDesign CS2/CS3/CS4/CS5/CS5.5/CC 2015 and Illustrator CS2 converter, Adobe InDesign CS2/CS3/CS4/CS5/CS5.5/CC 2015 and Adobe Illustrator CS2 application should be installed in the same machine with the corresponding converter.
Adobe InDesign CS2, CS3, CS4, CS5, CS5.5 and CC 2015, applications or converters, annot be installed on the same machine.
- Note: Adobe InDesign CC 2015 converter is used for file processing in In-context Review feature, not for extracting localizable content extraction in job creation.
To install the converters
- Unzip the converter package to local system, for example, Adobe_CS5_Converter.zip for InDesign CS5
- Double-click AdobeConverter.exe to run the converter
- Select InDesign Converter CS2/CS3/CS4/CS5/CS5.5 and Enter or Browse the directory that is used in Install GlobalSight > Optional Packages > Adobe (CS2)/(CS3)/(CS4)/(CS5)/(CS5.5) Adapter Conversion Directory
- For example: D:\winfiles\CS5 or \\192.168.1.29\winfiles\CS5
- Select Illustrator Converter CS2 and Enter or Browse the directory that is used in Install GlobalSight > Optional Packages > Adobe (CS2) Adapter Conversion Directory
- Click Start
To uninstall the converters
- Click Stop
- Remove the Adobe Converter directory
Installing the FrameMaker 9 Converter
The GlobalSight FrameMaker 9 Converter requires the Adobe FrameMaker 9 software to be installed.
To install the GlobalSight FrameMaker 9 Converter
- Extract GlobalSight_FrameMaker9_Converter.zip
- Double-click setup.exe to start the installation
To add plugin to Adobe FrameMaker 9
- Stop FrameMaker 9 application
- Copy \path\to\FrameMaker9\Converter>\fmconv.dll to \path\to\Adobe\FrameMaker9\appliation\fminit\Plugins folder
- Add the following line to [APIClients] section in file \path\to\Adobe\FrameMaker9\appliation\maker.ini
fmconv=Standard, GlobalSight FMConvert, fminit\Plugins\fmconv.dll, all
To start the converter
- Click Start->Programs->GlobalSight->FrameMaker 9 Converter
- Specify the FrameMaker 9 Path, that is the path to FrameMaker 9 application
- Specify the Conversion Directory
- This should match the directory that you set in the Install GlobalSight > Optional Packages > FrameMaker 9 Adapter Conversion Directory.
- For example: D:\winfiles, or \\192.168.1.29\winfiles
- Click Start
To un-install the converter
- Stop the FrameMaker 9 Converter
- Remove fmconv.dll from FrameMaker 9 installation folder
- Remove line
fmconv=Standard, GlobalSight FMConvert, fminit\Plugins\fmconv.dll, allfrom maker.ini file - Click Control Panel-> Add or Remove Programs to remove the FrameMaker 9 Converter
Starting and stopping GlobalSight
Use this procedure to start GlobalSight. The procedure starts and stops Jboss only, since all other GlobalSight components run as automatic services and are therefore already running when the machine is started.
To start GlobalSight in service mode
- Type: sudo service globalsight start
- Check the GlobalSight.log in the <globalsight_home_directory>/logs directory. If GlobalSight starts successfully, the message below shows in GlobalSight.log:
GlobalSight is now ready to accept logins- Note: you can use command sudo /etc/init.d/globalsight start instead.
To stop GlobalSight in service mode
- Type: sudo service globalsight stop
- Note: you can use command sudo /etc/init.d/globalsight stop instead.
To start GlobalSight in console mode
- Run <globalSight_home_directory>/jboss/server/bin/standalone.sh
- Wait for the following message:
-----------JBOSS -- GlobalSight started ------------
To stop GlobalSight in console mode
Press Ctrl + C in the Ubuntu Console.
Logging in to GlobalSight
When GlobalSight is started, you can log in GlobalSight as follows:
- Open Internet Explorer and go to: http://server.domain.com:port/globalsight
- "server.domain.com" is the value entered for
J2EE App Server Hostname or IP Address - "port" is the value entered for
J2EE App Server HTTP port - If you have set
Public login URL, use it.
- "server.domain.com" is the value entered for
- Log in with GlobalSight administrator account
- Username: gsAdmin
- The default GlobalSight administrator's username, if you didn't change it during installation.
- Note: the username is case insensitive, you can also type gsadmin as username.
- Password: password
- The default password for the GlobalSight administrator user, if you didn't change it during installation.
Uninstalling GlobalSight
To uninstall the GlobalSight application and the third-party components, follow the steps below in the order listed. All uninstallation procedures assume that GlobalSight is not running.
To uninstall the core application
- Stop GlobalSight
- Type: sudo service globalsight stop
- Note: you can use command sudo /etc/init.d/globalsight stop instead.
- Remove the GlobalSight service
- Type: sudo update-rc.d globalsight remove
- Remove the GloabalSight application server
- Type sudo rm -r <globalsight_home_directory>
- Example: sudo rm -r /home/jboss/GlobalSight
- Remove the GloabalSight documents and file storage directory
- Type sudo rm -r <globalsight_document_directory>
- Type sudo rm -r <globalsight_filestorage_directory>
- Example: sudo rm -r /home/jboss/welocalize/docs
- Example: sudo rm -r /home/jboss/welocalize/filestorage
To uninstall JDK Remove the directory /usr/local/java
- Type: sudo rm -r /usr/local/java/jdk_version
- Example: sudo rm -r /usr/local/java/jdk1.8.0_45
To uninstall MySQL generaic binary package
- Backup GlobalSight database
- Type: mysqldump -uroot -p <globalsight_database_name> > <dump_file>.sql
- Example: mysqldump -uroot -p globalsight > globalsight-dump-201604.sql
- Stop MySQL
- Type: sudo service mysql stop
- Note 1: depending on your MySQL setup, the service name may be mysql.server.
- Remove MySQL service
- Type: sudo update-rc.d mysql remove
- Note: depending on your MySQL setup, the service name may be mysql.server.
- Remove the directory /usr/local/mysql
- Type: sudo rm -rf /usr/local/mysql
- Remove the configuration file /etc/mysql/my.cnf
- Type: sudo rm -f /etc/mysql/my.cnf
To cleanup the system variables
Edit the file /etc/profile and remove JAVA_HOME variable and update PATH variable.
