Installing Third-party Components for GlobalSight on Ubuntu
Contents
Prerequisites
- The GlobalSight software package for Ubuntu has been downloaded as described in Installing GlobalSight
- Download MySQL Community Server from the MySQL website
- The login user has the sudo privilege.
Choosing passwords for GlobalSight components
Use an 8-character password, that is the combination of the company name and an integer. For reference, the following is a list of usernames and passwords for all of the GlobalSight components. Your new cross-component GlobalSight password is shown as <password>.
| Component | Username | Password | Description |
|---|---|---|---|
| MySQL | root | <password> | The root-user for MySQL. It doesn’t set default password for MySQL root user, but it is recommended to set it after the installation. |
| MySQL | globalsight | <password> | The user that owns all of the GlobalSight tables |
Installing the MySQL Database Server
To install the MySQL Database Server and GlobalSight application on separate servers, you need to install either the MySQL server or MySQL client on the same server as the GlobalSight application.
The instructions below apply to MySQL Community Server.
Installing MySQL from tar.gz Packages
Prerequisites:
- You have downloaded the latest supported version
- The current user needs read/write privileges to the /usr/local directory
- The current user needs the sudo privilege
- Uninstall any versions of MySQL previously installed
Type: sudo service mysql stop
Type: sudo apt-get remove mysql-server
Type: sudo apt-get autoremove
Type: sudo rm -f /etc/mysql/my.cnf - Install shared library required by MySQL
Type: sudo apt-get install libaio1
To install MySQL:
- Download and copy mysql-5.5.31-linux2.6-x86_64.tar.gz to local system
- Unpack the tar.gz file
Type: cd /usr/local
Type: tar zxvf /path/to/mysql/package/mysql-5.5.31-linux2.6-x86_64.tar.gz - Create a symbolic link for the MySQL directory
Type: sudo ln -s mysql-5.5.31-linux2.6-x86_64 mysql - Create a user and a group for MySQL
Type: sudo useradd –r mysql - Change the owner and group attributes of the files to the MySQL user
Type: sudo chown -R mysql:mysql /usr/local/mysql-5.5.31-linux2.6-x86_64 - Go to the MySQL directory
Type: cd mysql - Set up the MySQL internal database by running the script
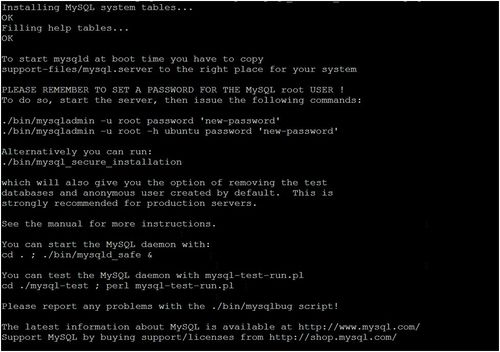
Type: sudo ./scripts/mysql_install_db --user=mysql --basedir=/usr/local/mysql
The information below pops up when the script is imported successfully - Create a new start script for MySQL
Type: sudo cp ./support-files/mysql.server /etc/init.d/
Type: sudo update-rc.d mysql.server defaults 98 - Set the path by adding the following to /etc/profile file
export PATH=$PATH:/usr/local/mysql/bin
Note: you need to log in again for the PATH to take effect
Configuring the database
To configure the database:
- Create the /etc/mysql directory, if it does not already exist
Type: sudo mkdir /etc/mysql - Copy the default configuration file for the expected size of the database
Type: sudo cp /usr/local/mysql/support-files/my-medium.cnf /etc/mysql/my.cnf
Type: sudo chown mysql:mysql /etc/mysql/my.cnf - Add or update the following under the [mysqld] section in /etc/mysql/my.cnf
Update:
max_allowed_packet = 16M
Add:
default-storage-engine=INNODB
lower_case_table_names=1
log-bin-trust-function-creators=1
character-set-server=utf8
collation-server=utf8_general_ci
init-connect='SET NAMES utf8'
max_connections=500
innodb_file_per_table=1
Uncomment and update:
innodb_data_home_dir = /usr/local/mysql/data/
innodb_data_file_path = ibdata1:10M:autoextend
innodb_log_group_home_dir = /usr/local/mysql/data/
innodb_buffer_pool_size = 50M
innodb_additional_mem_pool_size = 2M
innodb_log_file_size = 5M
innodb_log_buffer_size = 8M
innodb_flush_log_at_trx_commit = 1
innodb_lock_wait_timeout = 500
Comment:
log-bin=mysql-bin
binlog_format=mixed - Add the following under the [client] section in /etc/mysql/my.cnf
default-character-set=utf8 - You can now start the MySQL server
Type: sudo service mysql.server start - Set a password for MySQL root user
Type: sudo /usr/local/mysql/bin/mysqladmin –u root password ‘new-password’
Creating the GlobalSight database and user using the MySQL command line
To create the database and user using the MySQL command line:
- Log in to MySQL as root
Type: mysql -uroot -p<mysql_root_password> -h<mysql_hostname_or_ip_ address>
If the MySQL root user password is not set, you can login to MySQL by
Type: mysql -uroot -h<mysql_hostname_or_ip_ address>
Grant the privileges and change the password for the root user
Type: grant all on *.* to 'root'@'localhost' identified by '<mysql_root_password>'; - Create the GlobalSight database
Type: create database <GlobalSight Database Name>;
Example: create database globalsight; - Create a database user for GlobalSight
Type: create user '<User Name>'’@'%' identified by ‘<Password>’;
Example: create user 'globalsight'@'%' identified by 'password'; - Grant all privileges of the GlobalSight database created above) to the database user created above
Type: grant all on <GlobalSight Database Name>.* to '<User Name>'@'%' identified by '<password>';
Type: flush privileges;
Assume that your have created a database named “globalsight”, the user name is “globalsight”, and the password is “password”. Then, the command should be:
Example: grant all on globalsight.* to 'globalsight'@'%' identified by 'password';
Example: flush privileges;
Note:If you want to connect to the MySQL server from other network ip, you need to grant privileges to the network ip address.
Type: grant all on globalsight.* to 'globalsight'@’192.168.29.29’ identified by ‘password’;
you can also use '%' instead of the specific network ip address to add all the network ips.
Type: grant all on globalsight.* to 'globalsight'@’%’ identified by ‘password’;
Also need to use command flush privileges
Type: flush privileges; - Commit the change
Type: commit; - Exit Mysql
Type: exit
Testing the MySQL setup
To test the MySQL setup:
- Log in to MySQL as the user created earlier. This example uses the MySQL user 'globalsight' with the password 'password'
Type: mysql -uglobalsight -ppassword -hlocalhost - Connect to the MySQL database created earlier. This example uses the database name 'globalsight'
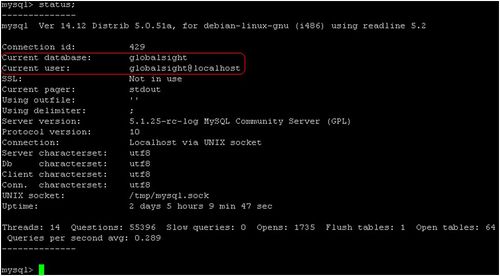
Type: use globalsight - Check the status
Type: status
Note: The status information for 'Current database:' and 'Current user:' should match the information entered above
You also use the MySQL username, password and database name later in the GlobalSight setup - Exit MySQL
Type: exit
Installing JDK
The JDK package should be installed on the same server as the GlobalSight application.
To install JDK:
- Download the latest supported version. You can also find the setup file in the GlobalSight Software Package
- Create the directory for Java, if it does not already exist
Type: sudo mkdir /usr/local/java - Unpack JDK package to directory for Java
Type: cd /usr/local/java
Type: sudo tar zxvf /path/to/jdk/package/jdk-7u21-linux-x64.tar.gz - Set the JAVA_HOME and PATH
Edit /etc/profile file and add the content as below:
export JAVA_HOME=/usr/local/java/jdk1.7.0_21
export PATH=$PATH:$JAVA_HOME/bin
export PATH
Note: you need log in again for the PATH change to take effect

