Using Pop-up Editor
| Related Information: |
Pop-up Editor is one of the online editors used in GlobalSight for translating online and reviewing online.
Segments are color-coded and locked/unlocked for editing according to the match types.
Contents
- 1 Opening Files with Pop-up Editor
- 2 Changing the Layout Mode
- 3 Navigating
- 4 Filtering in Pop-up Editor
- 5 Translating with Pop-up Editor
- 6 Pop-up Editor features
- 6.1 Color-coding
- 6.2 Locking and Unlocking
- 6.3 Segment Editor
- 6.4 Segment Comments
- 6.5 Showing PTags
- 6.6 Showing Repeated Segments
- 6.7 Auto-propagating Repeated Segments
- 6.8 Searching
- 6.9 Character Count
- 6.10 Showing Comments
- 6.11 Support Files
- 6.12 Viewing Termbases
- 6.13 Viewing Page Info
- 6.14 Preview
- 6.15 Color Preview in PDFs
- 6.16 Fuzzy Matches
- 6.17 Corpus Context
- 6.18 Concordance
- 6.19 Moving and Deleting Style Tags
- 7 Setting Your Options
Opening Files with Pop-up Editor
You can open any target file with Pop-up Editor by right-clicking it and selecting Open in Popup editor.
You can set Pop-up Editor as your default editor by selecting it as your Editor Selection in My Account. You can then open the file in your preferred editor with one click.
Changing the Layout Mode
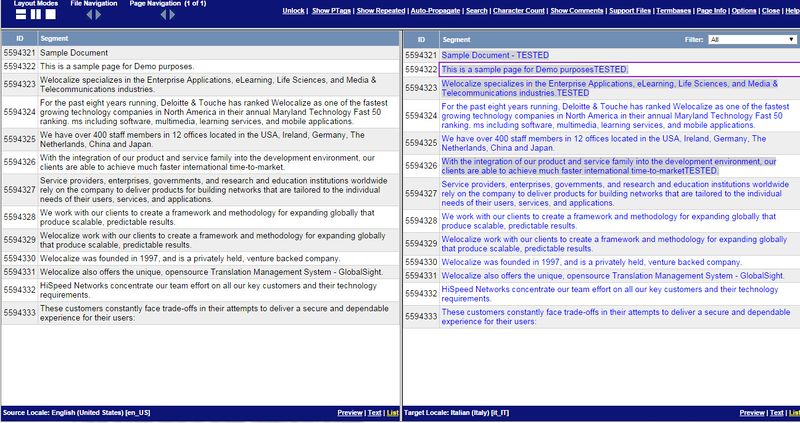
By default, the source locale shows on the left and the target locale on the right. Comments show at the bottom.
You can change the layout by clicking another Layout Modes.
You can browse from file to file using the File Navigation arrows and from page to page using the Page Navigation arrows until the activity is complete.
You can also browse from segment to segment when editing segments in the Segment Editor.
Filtering in Pop-up Editor
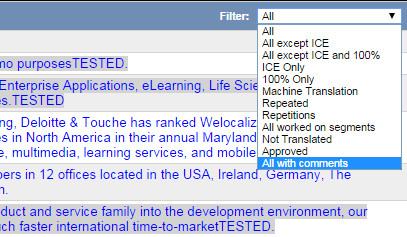
You can filter by match type by clicking Filter.
You can filter by:
- All
- All except ICE
- All except ICE and 100%
- ICE Only
- 100% Only
- Machine Translation
- Repeated
- Repetitions
- All worked on segments
- Not Translated
- Approved
- All with comments
Translating with Pop-up Editor
Pop-up Editor is used for translating content online.
Pop-up Editor features
Color-coding
Pop-up Editor uses color-coding to show different matching types.
You can customize some of these by clicking My Account->Account Options.
| Color | Meaning | Action needed | Text |
|---|---|---|---|
| Light gray | An exact match was found in the TM | None. The segment is locked and cannot be edited.
Click Unlock to edit. |
|
| Green | An exact match was found in the TM | None. The segment is unlocked and can be edited if needed | |
| Purple | An In-Context Exact (ICE) match was found | None. Click Unlock to edit | |
| Blue | No match was found in the TM | Translate the text | |
| Orange | A glossary match was found | None | |
| Pink | A fuzzy match has been found | Check the Segment Editor for the matches and edit as needed | |
| Red | The segment is a repetition | None | |
| Blue on gray | The segment has been saved | The segment has already been worked on and saved |
Locking and Unlocking
Locking is used to avoid translating segments that have exact matches. Locking and unlocking is enabled on a project basis by the Project Manager.
Click Unlock to allow editing of segments with exact matches. You can also click Lock to lock the segments again.
Segment Editor
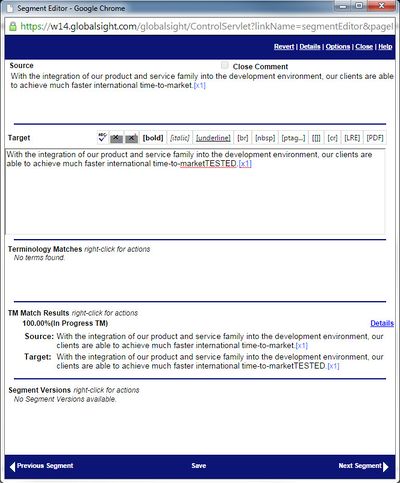
For translators, clicking a segment causes the Segment Editor to pop up, allowing you to edit the translation in that segment.
Segment Comments
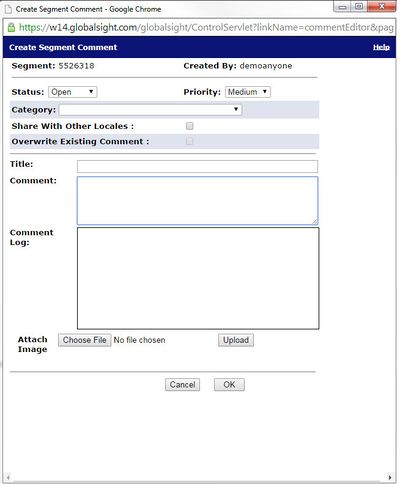
For reviewers, clicking a segment causes the Create Segment Comment box to pop up, allowing you to add comments on translations in that segment.
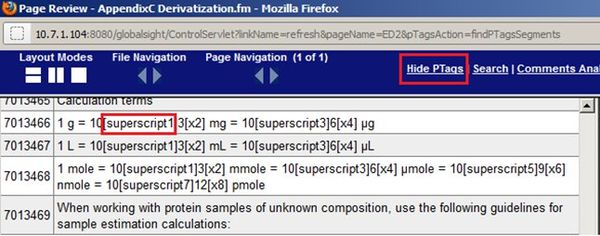
Showing PTags
You can use a [superscript] tag to show the exponent.
For example 103 = 10[superscript]3.
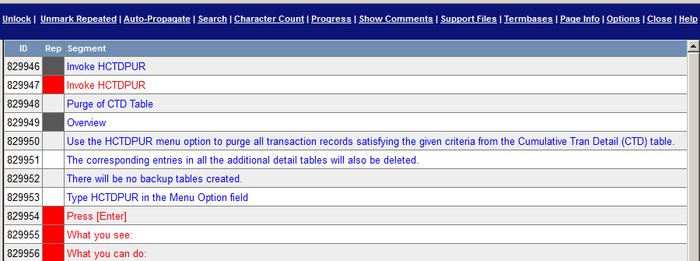
Showing Repeated Segments
You can show repeated segments by clicking Show Repeated.
The Rep column shows with repeated segments in dark gray and segment repetitions in red.
Auto-propagating Repeated Segments
You can automatically propagate translations for repeated segments by clicking Show Repeated and then clicking Auto-Propagate.
To propagate translation automatically:
- Click Auto-Propagate
- Select the File Scope
- Select the Segment Scope
- Select the Multiple Translations
- Click Propagate
Searching
Click Search in the top menu to search by:
- User ID: Select the user ID from the list to search all segments and highlight edits by that user
- Segment ID (SID): Enter an SID to search for and highlight that segment
You can also filter the search further by typing text in the Filter By box and clicking OK.
You can also search for text by using your browser's search function. Pressing Ctrl+F works in most browsers.
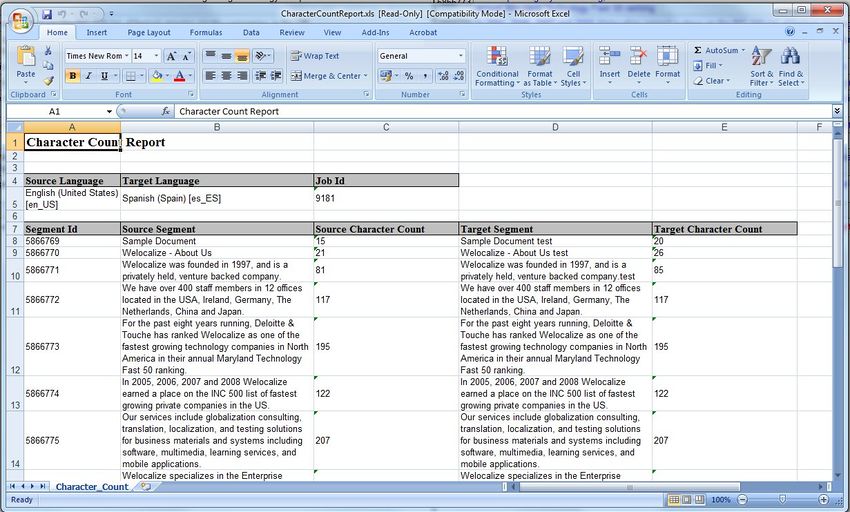
Character Count
Click Character Count in the top menu to open a character count report in Excel. Character Count must be enabled in your Permission Group. Contact your Project Manager for details.
Showing Comments
Click Show Comments to open the Comments window at the bottom. Comments from reviewers are marked with a yellow icon.
Support Files
Click Support Files to open a list of the reference files that have been included, if any. You can view or download the files.
Viewing Termbases
Click Termbases to open a list of the termbases associated with the project. You can also browse each termbase.
Click the termbase name to open the Termbase Viewer.
Viewing Page Info
Click Page Info in the top menu to open an overview of the basic details of the page. For example the page name and ID, the total words and total segments and so on.
Preview
By default, files open in the List view.
You can also view the raw Text or launch a Preview of the file as you edit it.
| List | Segments are listed sequentially | |
| Text | Segments show in their raw format, as non-localizable code.
For example, HTML, XML and so on | |
| Preview | Segments show as they would in their intended format.
You can view a PDF for those file formats that support it:
The converter can take a few moments to run. You can view In-Context Exact (ICE) matches for the file formats supported. You can download the PDF to your computer by clicking Save->Save a copy. The PDF is for reference only. Comments are added as usual online or offline in the Reviewer Comments Report. |
Color Preview in PDFs
You can add color to the PDF preview to distinguish between 100%, ICE and non-100%/ICE matches.
For example, you can set black for 100%/ICE and red for all others.
To set the color preview:
- Select the job
- Click the file to open it in Pop-up Editor, the default editor. If not, change your editor preferences or right-click and select Popup Editor
- Click Options and add the settings below
- Click Apply and then click Close
- Click View PDF
The PDF opens and shows the 100% and ICE (in-context exact) matches in red and all other categories of matches in black.
Fuzzy Matches
To get a fuzzy match into the editor:
- Click a pink segment in pop-up editor
- Right-click the text under TM Match Results in the Segment Editor box
- Click Copy to editor to put the sentence into the Target area
Corpus Context
Corpus Context shows the source and target document that the translation comes from. Click Corpus Context in the same context menu. Use the Segments in Partial Context box to select the Source Document or the Target Document to see the whole document where the strings originally appeared.
This operation can take a few minutes.
For segment matches in the TM that are only imported and not saved when a job is exported in GlobalSight, the message There are no available corpus TM matches shows.
Concordance
Prerequisites:
- Check that concordance is set up in your installation in GlobalSight Optional Packages. Confirm with the GlobalSight team
- Check that you have permission to use concordance. Permission is set in Edit Permission Group->Setup->Translation Memory (View)
To search for a term or sentence in the corpus:
- Click Concordance at the top of the Segment Editor in Pop-up Editor. The Corpus Browser opens
- Enter the term to search for and make sure to select the Translation Memory that you use
- Select any of the documents by clicking the icon
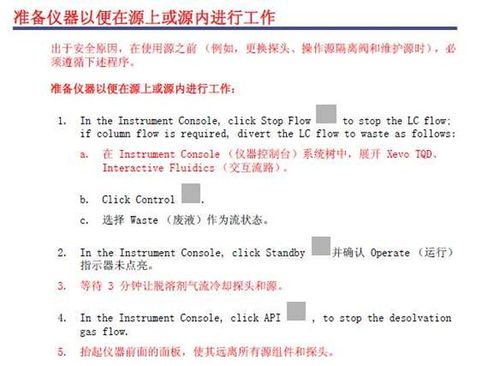
Moving and Deleting Style Tags
You can re-arrange style tags within a segment when using the MS Office 2010 filter to translate either MS Office 2007 or 2010 documents.
The style tags are:
| Style | Tag |
|---|---|
| Bold | [bold] [/bold] |
| Color | [color] [/color] |
| Italic | [italic] [/italic] |
| Underline | [underline] [/underline] |
| Hyperlink | [hyperlink] [/hyperlink] |
Example 1:
The bold tags ([bold1] and [/bold1]) around the word “Welocalize” have been moved to the word “1997”. Color tags ([color3] and [/color3]) around the word “1997” have been moved to the word “privada” in the target segment.
Example 2:
Removing the style tags in an RTF file. All color and bold tags in the target have been removed.
You can only re-arrange and remove style tags. Tags such as [x5] and [x19] cannot be moved and must be in the correct order.
Setting Your Options
Click Options in the top menu to change Main Editor Options. For example the colors used, the layout of the page and so on.
The same options, and others, can be set in My Account->Account Options.


