Configuring Desktop Icon
Configuring Desktop Icon
To use Desktop Icon to create and view jobs, you first need to configure it to log on to a remote GlobalSight server to process jobs.
You also need to configure the connection with the GlobalSight users that you have already set up.
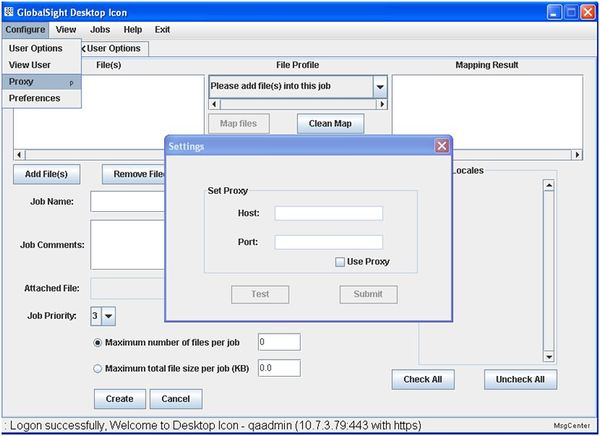
You can set a proxy to use Desktop Icon.
To configure Desktop Icon:
- Open Desktop Icon by clicking the shortcut added to your desktop. You can also click Start->All Programs->GlobalSight Desktop Icon->Run Desktop Icon
- Click Configure->User Options
- Enter the information needed and click Logon. Desktop Icon confirms the successful login in the Status bar:
- Host Name: enter your GlobalSight URL. For example www.globalsight.com
- Use https: click here if your GlobalSight instance has HTTPS enabled
- Host Port: enter the port used for communicating with GlobalSight. For example, 80 for HTTP or 443 for HTTPS
- User Name: enter the user name for connecting to GlobalSight
- Password: enter the GlobalSight password for the user
- Contact your GlobalSight administrator with any login problems. Login can fail if you are the first user from within your network to connect to GlobalSight, since GlobalSight has not been configured to accept connections from your network. Note the IP address in the error message and e-mail it to your administrator to open up access for your IP address range
- Click Apply
- Save the configuration, or Desktop Icon does not runFile:UsingDI3.jpg600px
- Click the Create Job tab to return to the main screen
Desktop Icon saves your credentials for future use. Your logon confirmation shows on the status bar.
You can now create jobs with Desktop Icon.
To set a proxy to use Desktop Icon:
- Click Configure->Proxy
- Enter the Host and Port details
- Click Use Proxy
- Click Test or Submit, as needed
- Restart Desktop Icon to apply the new proxy settings

